How to install a threaded rivet?

Rivet is a very peculiar way of non-separable fasteners. One of its indisputable advantages is its low cost. In addition, such fastening allows you to avoid unnecessary deformation of the workpieces, does not cause changes in their physical or chemical properties, since it excludes heating, allows you to connect parts of different nature. In this article, we will talk about installing the so-called threaded rivets.


What do you need?
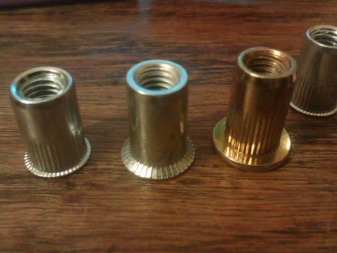
A threaded rivet is somewhat different in its structure from the same widespread blind rivets. The main part of both types of consumables - a crumpled metal sleeve - is very similar. But in the case of threaded rivets, the pull rod is absent, its role is played by a special threaded nozzle on the rivet.
After installing such fasteners, a reinforced metal threaded socket remains in the place where the structural parts are fastened, where a bolt or screw with an appropriate thread pitch can be inserted, onto which you can not only screw a nut, but also fasten a bracket, corner or any other structural element. This distinguishes threaded consumables from exhaust ones.
To install such fasteners you will need:
- the consumable itself is a rivet;
- drill;
- a drill with a diameter of 0.1 mm larger than the diameter of a rivet;
- riveter for threaded rivets.
Of course, a tape measure, a pencil may be needed for marking, sometimes, if the material requires it, a core.


If there is no rivet, and you only need to install a few threaded rivets, buying one, of course, is not necessary. Craftsmen recommend making a device for installing screw rivets yourself. Of course, it is impossible to do this without, albeit a small, set of materials and tools.
But if there is a stock of all sorts of bolts, nuts and other technical junk, it is quite possible to try to pick up components for a homemade riveter.
For such a homemade tool you will need:
- long bolt with the same pitch as the rivet;
- two washers with an inner diameter corresponding to the diameter of the bolt;
- a sleeve from a nut of a larger diameter;
- a nut that can be screwed onto a bolt.
It is quite good if the main working elements - the bolt and the nut - are made of harder steel. This will greatly increase the reliability and durability of the homemade riveter.


This, of course, is not an obligatory set; you can try to assemble the device from other components. And if you have a welding machine, you can build a tool with reinforced handles, which reduce efforts and increase the reliability of homemade products.
Step-by-step instruction
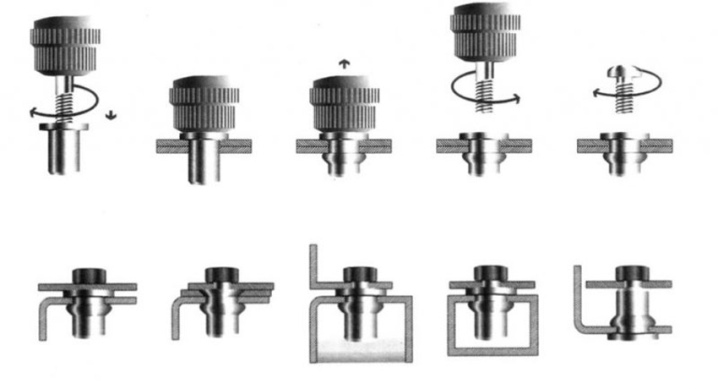
If there is a riveter, it must be adjusted to the corresponding rivet nut, the stroke of the threaded rod must be adjusted in accordance with the rivet length. If all adjustments are correct, the step-by-step instructions for installing a threaded rivet looks, in general terms, as follows:
- connect parts or structural elements as required;
- knowing the diameter of the rivets, choose a drill 0.1 mm larger;
- drill the blanks, trying to maintain the perpendicular;
- screw the rivet onto the stem of the rivet head;
- install the connection by pulling the threaded rod with the riveter handles;
- unscrew the rivet.

That's all, fastening with a screw rivet is carried out. If necessary, you can strengthen the connection with a bolt and nut, or install any other structural element using a bolt, since a threaded fastener has appeared on the surface.

It is quite possible to fasten a threaded rivet without a rivet using a homemade device.
It is important to remember: if the bolt has a low steel hardness, it will not work to rivet it repeatedly. Even with very careful use, it will hardly be possible to install more than 5 pieces. Either the thread will be stripped, or the bolt will break off altogether.
If the device is assembled from those elements that are listed above, in general terms, it is worth setting a rivet with it as follows:
- drill a mounting hole with a diameter of 0.1 mm larger than the diameter of the rivet;
- assemble a homemade riveter: screw a nut onto a long bolt with a thread corresponding to the thread of the consumable, put a washer on it, then install a sleeve, which is also covered with a washer;
- screw a rivet onto the end of the bolt;
- turning the nut, ensure that the bushing rests against the rivet head through the washer;
- insert a rivet into the prepared hole;
- keeping the bolt from turning with a wrench, turn the nut with another wrench so as to pull out the bolt and deform the rivet;
- when it becomes difficult to turn, unscrew the bolt.


If necessary, you can strengthen the connection with a bolt and nut.
It is clear that self-made structures for installing threaded rivets, made by different craftsmen in different conditions from different components, may differ slightly.
One thing remains the main thing: it is necessary to pull out the sleeve so that rolling occurs. Some homemade riveting rivets are equipped with reinforced steel handles, which make it possible to exclude rather awkward wrenches from the riveting process.
An additional design element of a homemade riveting device with threaded consumables can be a small bearing that allows you to concentrate the force on the operation itself, reducing unnecessary friction.


Recommendations
The use of threaded rivets has its own subtleties.
- One of the most important conditions for the successful installation of threaded or nut rivets is that the diameters of the consumable and the mounting hole in the workpiece match, otherwise twisting may occur. It is much more difficult to install such a rivet. It is important to choose a drill with a diameter of no more than 0.1 mm larger than the rivet diameter.
- To avoid turning in the hole, it is better to select rivets that have a longitudinal notch in the upper part - they rotate much less often due to the friction of the notches.
- When drilling holes in workpieces, you can use a clamp or a vise to avoid parts shifting. Otherwise, it will not be possible to achieve a high-quality connection.
- When choosing material for a homemade device for installing threaded consumables, it is important to take into account the force that the rod (bolt) will experience. It is better to refrain from installing a large number of large diameter steel consumables.
- The most reliable connection is provided by hex rivets, but it is very difficult to prepare a bore for them. It is better to use such consumables for the installation of products made of thin material.
- Making a homemade riveting device is justified only when doing a small amount of work. If you plan to install several dozen, and even more so hundreds of rivets, it is simply necessary to purchase a high-quality riveter.
- For a home workshop, a manual riveting machine can be considered the most preferable; if an industrial scale of work is planned, electrical or pneumatic equipment is justified.
For information on how to install a rivet without a rivet, see the next video.


The comment was sent successfully.