Varieties and installation of siphons for a shower cabin

In the design of the shower stall, the siphon plays a kind of intermediate role. It provides the redirection of used water from the sump to the sewer. And also its function includes providing a hydraulic seal (better known as a water plug), which can not always be detected due to the presence of membrane analogs that protect the apartment from air with a fetid odor from the sewage system. The air from the effluent can be dangerous for the respiratory system and human health, as it is toxic.


The standard siphon design consists of two elements - a drain and an overflow, which is also not always present. The modern market offers consumers a wide variety and selection of a wide variety of siphons, different in design, method of operation and sizes.

Varieties
Based on the mechanism of action, all siphons are classified into three main groups.
- Ordinary - the standard and most common option that most consumers are familiar with. The scheme of action of an ordinary siphon is as follows: when the plug is closed, water is collected in the container; when you open the plug, the water goes into the sewer drain. Accordingly, such units have to be controlled completely manually. These siphons are considered completely outdated, although they are the cheapest and most budgetary ones. Therefore, most often they prefer more modern models with an improved mechanism.


- Automatic - these models are mainly designed for high pallets. In this design, there is a special handle for control, thanks to which the user independently opens and closes the drain hole.
- With Click & Clack design - is the most modern and convenient option. Instead of a handle, there is a button here, which is at the level of the foot. Therefore, if necessary, the owner can open or close the drain by pressing.


When choosing a siphon, first of all, you need to focus on the space under the pallet, because it is there that the structure will subsequently be installed.
Models reaching 8 - 20 cm are more common, therefore, for low containers, a low siphon is accordingly needed.

Designs and dimensions
In addition to the fact that they differ in their mechanism of action, siphons are also subdivided according to their design.
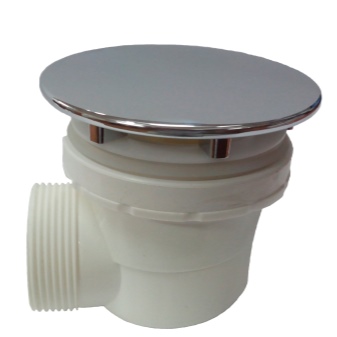
- Bottle - almost everyone has met a similar design in their home in the bathroom or in the kitchen. Based on the name, it is clear that such a design is similar in appearance to a bottle or flask. One end connects to a drain with a filter grate in the pan, the other to a sewer pipe. This bottle collects and accumulates all the garbage entering the drain before being disposed of into the sewer system. But also its functions include providing the system with a water seal. It is created due to the fact that the siphon comes out slightly higher than the edge of the inlet pipe.


There are two types in total: the first - with a tube submerged in water, the second - with two communicating chambers, separated by a partition. Despite the slight design difference, both types are equally effective. In general, this type of construction is distinguished by its impressive dimensions, which practically does not make it possible to use them in conjunction with shower stalls with a low base (a special podium will help here).They are convenient only in that they are very easy to clean from accumulated dirt inside, for this it is enough to unscrew the side cover or through a special hole at the bottom.


- Classic pipe - are also quite common models, visually look like a tube bent in the shape of the letter "U" or "S". The check valve is located in the natural pipe bend segment. The structure is reliable and highly stable due to its rigidity. This type, due to the smooth walls, does not heat up dirt well and therefore does not need frequent cleaning. Models can be purchased in different sizes, which are difficult to use with low pallets.


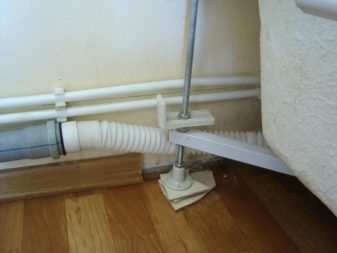
- Corrugated - this option is the most convenient if the space in the room is limited, since the corrugation can be given any desired position, which will also simplify the installation process. Accordingly, a hydraulic seal is formed at the bend, however, the water must completely cover the pipe opening for the hydraulic lock to function correctly. The disadvantage of a corrugated pipe is its fragility and the rapid accumulation of dirt in the folds, which requires frequent preventive cleaning.
- Trap-drain - characterized by simplicity of design and installation. Designed for booths with a low base, there are no plugs and overflow inlets. The height of the drain reaches from 80 mm.


- "Dry" - this design was developed with the lowest height value, while the manufacturers abandoned the classic hydraulic lock and replaced it with a silicone membrane, which, when straightened, allows water to pass through, and then takes on its original state and does not release harmful sewer gases. Visually, it looks like a tightly rolled polymer tube. The advantage of a dry siphon is that it functions perfectly at subzero temperatures and underfloor heating (it causes the water seal to dry out). It will fit even the lowest pallet. However, such fittings are the most expensive, and in case of clogging or breakage of the membrane, the repair will be expensive.

- With overflow - its installation is carried out only if it is provided for in the design of the pallet, in which case an appropriate siphon will be needed. It differs in that an additional pipe passes between the siphon and the overflow, at the same time, the fittings can be any of those listed above. Usually made from corrugated pipe, in order to change the location of the overflow if necessary. The overflow allows you to use the tray at the appropriate depth for washing things or as a bath for a small child.


- With a special basketthat can be retrieved. There are more cells in such a grid than in those found in self-cleaning siphons.
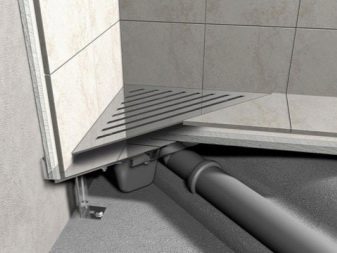
- Laddersequipped with a grate and a plug that closes the drain hole.
Paying attention to the most common type of pallets, namely low, corrugation is perfect for it, and even better - a drain ladder.


The drain is inserted like a regular siphon into the drain hole, or it is poured directly into the concrete base (into the concrete screed), which acts as a pallet. It is worth considering that the lower the height of the ladder, the more efficiently it performs its function.
Criterias of choice
The principle of operation and design are not the only criteria for choosing a siphon. Its technical characteristics and especially its diameter are important.


In order for the plumbing to serve for a long time and perform all its work with high quality, the necessary characteristics should be taken into account when choosing.
- The first thing to consider is the space between the pallet and the floor. This is the main and decisive criterion, all subsequent features are taken into account in the next turn.
- The value of the diameter of the drain hole. As a standard, pallets have diameters of 5.2 cm, 6.2 cm and 9 cm. Therefore, before buying, you must definitely find out the diameter of the drain hole by measuring it.If the siphon for connection to the sewage system already comes with a shower cabin and is fully suitable in all respects, then it is better to use it.

- Bandwidth. This will determine at what speed the container will be emptied of used water, how quickly the structure will clog, and how often it will need to be cleaned. The average flow rate for shower stalls is 30 l / min, a higher water consumption can only be with additional functions, for example, hydromassage. The indicator of the throughput is determined by measuring the water layer located above the level of the drain surface. For the complete removal of water, the level of the water layer should be: for a diameter of 5.2 and 6.2 cm - 12 cm, for a diameter of 9 cm - 15 cm.Therefore, siphons of smaller diameters (50 mm) are used for low pallets, and for high , respectively, large. In any case, the instructions for the shower stall should indicate the recommended throughput, which must be taken into account when choosing a siphon.


- The presence of additional elements. Even the best quality and functional siphons get clogged from time to time. In order not to have to completely disassemble and dismantle the system in the future, the drain protection must be thought out in advance. Starting from the moment of purchase, it is better to give preference to self-cleaning models or products with a mesh to stop small debris, which will prevent the drain from quickly clogging up. Important: in no case should the blockage be cleaned with compressed air, this can lead to leakage of the connections and the occurrence of leaks. An interesting fact is that the fewer connections a structure has, the stronger it is, and the less chance of its depressurization.


Installation
Despite some differences, all shower traps have the same installation order. Only additional elements are connected in different ways, for example, handles for "dry" siphons, a button for Click & Clack, and so on. However, it is best to clarify in advance in what order the installation takes place directly with the manufacturer, since different brands may have their own characteristics.


Before starting work, let's get acquainted with the components of the siphon structure.
- Frame. Fastened with threaded rods made of a resistant corrosion-resistant alloy, there can be from two to four pieces. The body itself is most often made of polymers, and the rest of the filling is placed inside it.
- Sealing rubber bands. The first is installed between the surface of the pallet and the body, the second - between the grate and the pallet. When buying, it is important to look at the surface of the rubber bands. Foreign manufacturers produce ribbed gaskets, and this significantly increases the level of sealing reliability, with a decrease in the tightening force. The latter provides a longer service life. In contrast to them, domestic manufacturers produce absolutely flat gaskets, which, on the contrary, negatively affects the service life.


- Pipe branch. This is a short tube used to connect the siphon to the outer sewer pipe. It can be either straight or angular, with an additional release (length adjustment).
- Self-sealing gasket, nuts with washer. They are attached to the branch pipe, and the nut is screwed onto the branch thread in the body.
- Water seal glass. It is inserted into the housing to stop sewer air from entering the room and retain large debris. Fixed with metal bolts.


- Safety valve. Protects the siphon during work. The valve is made of cardboard and plastic.
- Water seal. Equipped with rubber sealing rings, located in the glass.
- Drain grate. Manufactured from corrosion resistant alloy. Equipped with hooks and attached to the top surface of the glass. These locks protect the grill from unintentional release while showering.


Installation is more practical after placing the pallet on the base.
- We clean off the old glue with which the tiles were attached. At the time of facing work, the bottom row is never completed to the end, it needs to be installed only after finishing work with the pallet. We carry out cleaning in the room and remove all the resulting debris.
- We process the wall next to the pallet with waterproofing material. The area to be treated will be approximately 15 - 20 cm high. Mastic can be used as waterproofing, observing all the recommendations of the manufacturers. The number of layers directly depends on the condition of the wall.


- We fix the legs on the pallet. First, we spread the cardboard sheets so that the surface does not get scratched, and place the pallet upside down on them. We choose the most suitable arrangement of the legs, taking into account its size and the characteristics of the bearing surface. In any case, the legs should not come into contact with the sewer pipe. You need to fix the legs with self-tapping screws, which should come complete with the pallet itself. They have already been thought out for calculating the safety factor. Do not fasten reinforced self-tapping screws, as they can damage the front side of the pallet.


- We put the pallet with the fixed racks in the intended place and adjust the position with the screws located on the legs. The horizontal line is checked in both directions. First, we set the level on the pallet near the wall and adjust the horizontal position. Then we set the level perpendicular and set it horizontally again. At the end, go back to the pallet and align. Then we tighten the locknuts to prevent self-loosening of the thread.


- Insert a simple pencil into the drain hole and draw a circle under it on the floor under it. Draw lines along the bottom edge of the shelves. We remove the pallet.
- We apply a ruler and highlight the lines more clearly. This is where the side support elements will be fixed.
- We apply fixing elements to the marks and mark the location of the dowels. The top of the devices is clearly aligned.


- Now we drill the fixing compartments for the dowels about 1 - 2 cm deeper than the length of the plastic nozzle. A spare place is needed so that the settling dust does not prevent the nozzles from entering tightly. We fix the entire structure with dowels.
- We glue a waterproofing tape to the corners of the pallet, put it on double-sided tape.

After preparing the base and fixing the pallet, you can start installing the siphon. Do-it-yourself step-by-step instructions for attaching a siphon include a number of sequential operations.
- We unpack the siphon and check the integrity of the package, the reliability of the threaded connection.
- We put a nut and a sealing rubber on the branch pipe (short pipe). The resulting one is inserted into the body branch. To prevent the gum from being damaged, it can be lubricated with technical oil or ordinary soapy water.
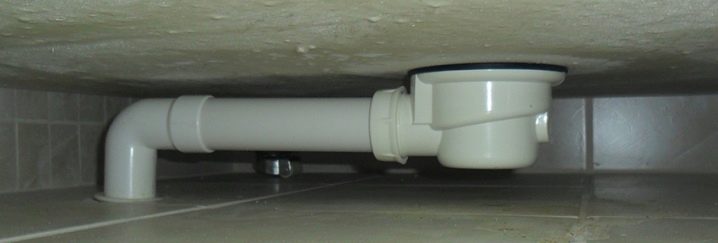
- We put the siphon on the circle outlined earlier, measure the length of the connected tube and cut it off. If the pipe and branch pipe are at an angle, then you need to use the elbow. We connect the knee. It should be fixed in the direction of the sewer entrance. It must be attached before the leak test of the shower stall is carried out. We must not forget that each connection must have a rubber seal. We check the slope of the drain pipe, which should not be less than two centimeters per meter.


- We press the pallet as close to the wall as possible and check the stability, the legs should not wobble. We fix the bottom edge of the side to the wall. We double-check and level everything up.
- We disassemble the siphon and remove the drain valve.
- We unscrew the sleeve from the body, take out the cover with the gasket.
- Apply sealant along the edge of the drain.
- We put the previously removed gasket into the groove along which the hermetic composition was applied.

- Now we apply the sealant to the gasket itself.
- We attach the removed cover to the drain hole of the pallet, the thread on the cover must be completely identical to the thread of the hole. We immediately make a connection and scroll through the sleeve on the lid.
- Next, you need to fix the drain. To do this, tighten the connection with a socket wrench, and then insert the valve.
- We proceed to the installation of the overflow. As with installing the drain, here it is necessary to lay a gasket with a sealant. Loosen the fixing screw and detach the cover. We combine the overflow lid with the drain hole in the pan. After the connection is tightened with an adjustable wrench.


- Finally, we connect the knee. This is mainly done with a corrugation and, if necessary, use the appropriate adapters.
- We check the connection for leaks with water. At this stage, one should not rush, and it is important to carefully check everything for small leaks. Otherwise, during operation, minor and invisible leaks may remain, which cause the growth of fungus and destroy the facing material.
- With a medium brush or a small roller, apply another waterproofing material to the wall, especially carefully process the joints.


- Without waiting for the complete drying of the mastic, we glue the water-repellent film and coat the second layer of mastic. We are waiting for the complete drying of the material, which on average takes a day, we specify it on the package.
- We install a decorative grill on the siphon and check the reliability of the fastening.
The siphon is installed and now you can start decorating the wall with tiles, connecting faucets, shower, shower and so on.


Cleaning and replacing
No equipment lasts forever, including siphons, no matter how high quality they are. Therefore, you need to know how to change them. First of all, we remove the decorative panel at the bottom of the shower tray, which is most often attached using snap-on clips. We press on the periphery on the panel with a little effort, and they will open.

Now we disassemble the old siphon in the reverse order of installation:
- detach the knee from the outer sewer pipe;
- unscrew the knee from the pallet with an adjustable wrench or washer;
- if an overflow is provided, then disconnect it;
- and at the end you need to disassemble the drain in the reverse order of its collection.

For all drains, except for 9 cm, you need to leave the so-called revision hole, thanks to which it will be possible to remove debris. In 90 mm, the waste is disposed of through the drain. Once every six months, it is necessary to carry out preventive cleaning; they can be cleaned with the help of special chemicals intended for pipes.
How to replace the siphon in the shower stall, see the following video.


The comment was sent successfully.