How to sharpen a metal drill at home?

Whatever the drill turns out to be - even a high-quality one - after hundreds of drilling cycles it becomes duller, losing the perfect sharpening given to the product itself at the factory. It will not drill a perfect, non-ragged hole until the drill is sharpened back to its former sharpness.

When should you sharpen?
Drill sharpening for metal is needed in the following cases.
- Jumps off from the point marked with the help of the core.
- When trying to drill without marking the future hole, the drill does not catch on the selected point with the tip of the tip, but “walks”, no matter what efforts the master makes.
- There is a beating, knocking, noise during drilling, turning into a high-frequency clang. The knocking and vibration loosens the drill (or hammer drill). On the mechanics broken by blunt drills, you cannot drill with new, just purchased drills: a new drill often breaks from this.
- Overheating even after a minute of continuous operation. Overheating of high-speed steel will lead to a loss of its strength properties (toughness, hardness), and the product will be suitable only for woodwork, and not for metal.
- Metal particles become torn, spiral shavings disappear.
If one or more signs are found, stop drilling immediately and check the sharpness of the tip and spiral edges.

Required tools
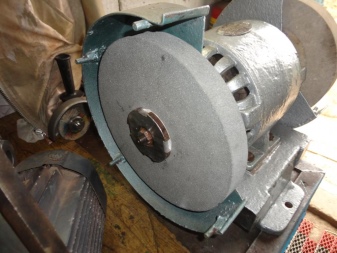
Any of the selected tools, including those equipped with an electric motor, must sharpen steel products (knives, drills, scissors, etc.). The second requirement is to keep the drill to be sharpened in the process. How quickly and efficiently the drill sharpens depends on the setting of the required grinding angle of the excess steel layer from the edges of the tip and the speed of pushing the product towards the grinding wheel. Mechanized sharpening tools allow you to bring a drill with a diameter of 3-19 mm to working condition in a couple of minutes. Twist drills are sharpened on special or conventional machines with an electric motor and a simple feed system. Such a machine can be assembled independently in a garage - there is no need to purchase professional machines; often, the straightening of the drilling point is straightened with a file, a sharpening stone or a circle.


Bulgarian
The master will need, in addition to the electric drive itself, a vice, in which the turned product is clamped.
The grain size of the grinding wheel is chosen so that the naked eye could not see the micro-furrows left by the grains of glass crumb, which grinds the metal.

To turn a drill with a grinder, do the following:
- clamp the drill vertically in a vice;
- grind the back edge to remove signs of wear;
- grind the cutting edge at an angle of 120 °.
Do not hold the drill continuously for more than two seconds. Short sessions consist in removing thin, much less than 1 mm, layers of alloy from the working edge. The drill is ready for use again.

Sharpener
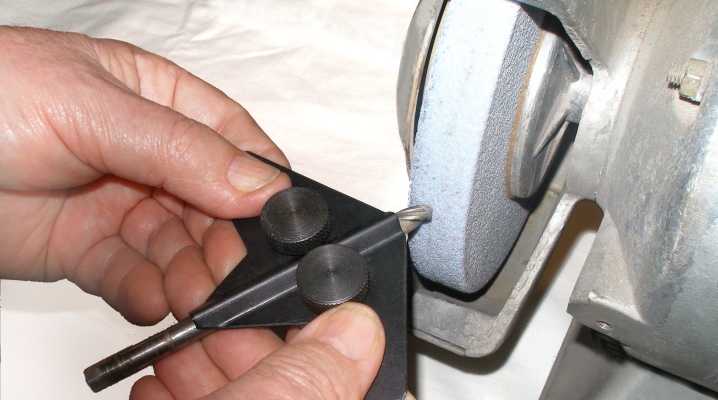
The grinder is distinguished by its speed of use, mobility, but the master pays for turning with its help with injury risk. Even putting on a protective cover on the grinder, there is a possibility that the wheel will crack, the tool will lead with a short jamming at a speed of thousands of revolutions per second. The sharpener reduces the risk of injury due to the rigid fixation of the machine itself. If it is impossible to determine the sharpening angle, a plastic template is applied, which is applied to the surface to be grinded before starting grinding. So that the holder does not go to the side, it is attached with a bolt. To turn the drill on a sharpener, do the following.
- Clip the drill into the holder and turn on the machine.
- Move the cutting edges to the grinding wheel at an angle of 120 °.
- If there are notches and dents on the drill, grind them off from all sides. They disrupt the alignment of the product and drill, causing the latter to vibrate unnecessarily.
Grinding drills of large diameter, due to the increased total heat capacity, the steel overheats, turning from a high-speed into a conventional one, unsuitable for drilling any other steels.


Drill bit
The drill bit allows you to grind drills for metal. The scheme of actions is as follows.
- Install the adapter for conventional drills on the drill. On a simple electric drill, it is unlikely to be required.
- Install a drill into the hole of the desired diameter.
- Start the drill and grind the drill on one side.
- To turn the second cutting edge, turn the other side of the drill from the same end.
The drill bit will only sharpen a slightly dull drill bit.
A product with dents and notches on the cutting edge cannot be sharpened with a drill.
But due to the relatively low cost - in comparison with other tools - turning drills on a nozzle is inexpensive.


File or file
The file is not suitable for processing high-speed steel, which is characterized by increased hardness compared to other grades and grades of steels. When using rough or diamond-coated stones, it is difficult to maintain the desired sharpening angle by hand. Use motorized sharpening devices.

Technology
To sharpen a drill with high quality, certain devices are needed. Whether it is a small or a large drill does not matter - the technology is the same: the main work is performed by the cutting edges at the end, and the side spiral edges align the drilled hole, diverting the chips into the spiral channels.

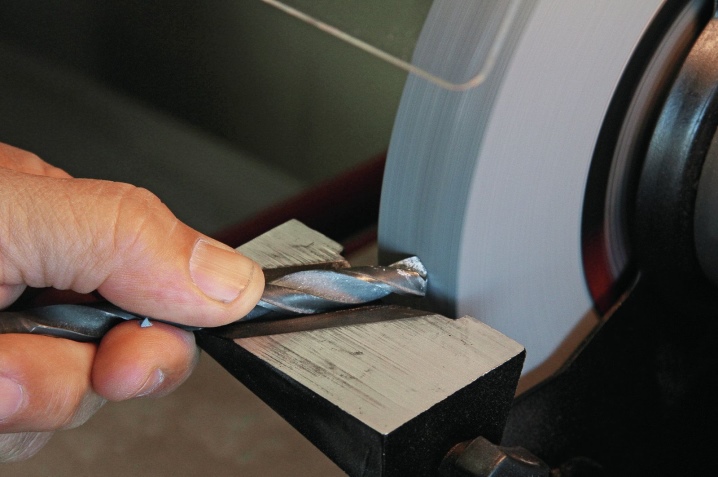
The easiest way to sharpen a drill is a sleeve, its inner diameter is equal in diameter to the section of the drill itself. The sleeve is fixed firmly at the desired angle. It is selected in the following way - the drill must clearly and with effort enter the template, without deviating even a degree. If the drill deviates, the incisal edges will not be recovered accurately, and as a result, it will "walk" while working. The sleeve can be completed with non-ferrous metal tubes, the inner diameter of which is equal to the most common values of the product diameter.

Especially knowledgeable craftsmen retrofit this device with a block of wood, drilled with drills of different diameters.
The template includes a handy tool that facilitates the feed of the drill to the grinding wheel for sharpening and does not allow the product to move in the opposite direction. The harder the type of wood from which the bar is made, the more accurately the angle is set: for example, the master uses an oak bar to feed the drill, while the swing of the drill in it when sharpening, its swing is excluded. The machine - for example, the same whetstone - can be home-made: the main thing is that the whetstone is not centered, does not vibrate during operation.


Correct angle
The angle is determined by the type of steel or other metal (or alloy) in which the holes are drilled. The lower the hardness of the metal or alloy, the greater the sharpening angle. So, for steel, cast iron and bronze, the workpieces from which need to be drilled, the sharpening angle reaches 120 °, for plastic and soft alkali metals such as magnesium - 85 °.


But for glass and porcelain stoneware, the angle is even dumber - 135 °, the same is required for soft bronze and aluminum alloys.
Any tree species requires 130 °. 115 ° is sufficient for stainless steel. The fact is that an easily yielding metal forms more chips in a short time, excessive friction occurs, and the tip of the drill heats up more and faster. And excessive heat dulls it - even the hardened steel from which the drill is made is tempered when heated. The steel of the product loses its hardness and begins to blunt rather.

Debugging
You can bring a rebuildable drill at home on special grinding wheels that combine coarse grinding of high-speed steel with fine-grained one. These discs contain a relatively soft filler that eliminates rough scratches, notches and gouges from work. They are eliminated without changing the shape of the cutting edges. These discs are placed on a grinder or drill, and the drill is clamped on a separate clamp or in a vice. If the processing with wheels turned out to be rough, the product itself is ground with a rotating emery wheel.

Examination
A quick check of correct sharpening is achieved by means of a special template that measures the length of the cutting edges, the location of the tip, the angle of the bevel of the outlet channels on the drill and the value of the angle of the longitudinal edge.

Undercut
If the master's 10 mm drill is dull, then the product is sharpened from the side of the leading edge. The task is to increase the angle of the cutting edge and reduce the bevel of the leading edge, narrowing of the transverse edge.
The latter will allow the metal or alloy on the workpiece to be scraped more actively in the center of the hole.
This prevents the accelerated breaking of the smallest grains of steel from the point, which means that it extends the service life of the drill, makes it possible to drill faster and more. The product is additionally ground at a small clearance angle, which reduces the frictional force in the cut holes.


Recommendations
Ordinary drills are sharpened with their own hands on a simple sharpener, a saw with a large grinding disc, a grinder or a drill with a nozzle. But for crown ones, a special machine may be required. The fact is that the crown has an axis - the main drill, which is a common product. And if it sharpens in a simple way, then the serrated, saw-like edge of the crown will require machine conditions. The same is true for cone-stage drills.

Do not sharpen drills without a protective cover and screen - scattering of steel dust is dangerous to the eyes. Multiple eye damage, clogging with shavings is fraught with difficulties in their extraction.
In the worst case, due to intoxication with steel that rusts in a salty environment, a person will easily lose it. Be careful not to drill into the ceiling without a helmet - falling shavings also fall into unprotected eyes.
Get the right angle for your undercut. Too "flat" drill will not drill steel, too "steep" - wood, aluminum, bronze, magnesium, plastic. An incorrect angle will either cause the drill to wiggle and the hole will move, or it will jam and break.
Do not drill with ordinary high speed steel in glass, porcelain stoneware, granite, ceramics, high strength clay. For these materials, there is a so-called wins. Pobeditovy alloy significantly surpasses high-speed steel in strength. Do not try to drill through tempered glass - it will crumble immediately.
Do not sharpen victorious drills with plain emery and vitrified stone circles. - for these products there is a diamond, like those circles with which they cut stone, brick and hardened steel. Grind victorious drills at low speeds.

Do not overheat the drill when turning - overheated steel will experience tempering and become noticeably worse. She will no longer be either hardened or high-speed (instrumental).
Do not cool a red-hot chiselled drill bit in water or other cold liquids - it will penetrate with microcracks from sharp cooling. At the first attempt to drill a workpiece, the product will immediately break.
Do not deflect the drill when turning. The slightest care - even by a degree - will lead to uneven turning, vibration will occur, breaking the drill itself and loosening the gearbox and drill motor.
The lengths of the cutting edges differ from each other up to 0.3 mm. This limitation is observed when turning small diameter drills.

The length of the working part should not be less than a centimeter. If the drill breaks in half and part of the cutting area is thrown out, then do not grind drills, whose working section is now less than a centimeter.
Carbide-tipped drills (eg Pobedit, diamond-tipped) are sharpened using the same tools as solid-made drills made from the same materials.
How easy it is to sharpen a drill, see below.


The comment was sent successfully.