Drip irrigation from plastic bottles
No culture can do without more or less constant moistening of the near-root zone. However, ready-made automatic irrigation systems produced by manufacturers are either cumbersome or expensive. Making a homemade drip irrigation system in your country house or at home is not so difficult using ordinary plastic bottles. In other words, it is quite possible to organize dosed root irrigation of plants grown in your country house without using purchased pipes, filters and other devices. A little skill, ingenuity, patience - and you will not need to come to the site every 2 days, but it will be enough to visit it 1-2 times a week. With a careful attitude, homemade irrigation systems can work for 2-3 years or more, because all elements in them are easily replaced.
Advantages and disadvantages
The availability of the right materials isn't the only benefit of drip irrigation. Let's add a number of obvious aspects here.
-
The installation of the bottle system does not involve any significant cost. The main thing is to collect a certain amount of plastic containers.
-
No special creative or professional skills are required to install the system.
-
The self-made autowatering system is suitable for use both in the open field and in greenhouses, greenhouses and greenhouses in the country. It is versatile and ideal for irrigating green hedges, shrubs, flower beds and flower beds.
-
The system is practical, time-saving and easy to refill with water. At the same time, dosed water goes directly to the plant roots. Moisture is supplied rhythmically, and does not wash away the root processes.
-
The drip irrigation method does not lead to waterlogging of the soil cover, thereby preventing the growth of weeds, and soil overconsolidation does not occur. In other words, mulched soil does not require unnecessary loosening operations.
-
The degree of humidity in greenhouses is low, and this reduces the risk of dampness and the spread of painful manifestations.
-
The drip method significantly saves water resources.
-
Bottled water heats up soon, which is a positive factor for some crops.
-
The system is easy to install, and all its structural elements are easy to change.
-
During the operation of water meters, consumption indicators change insignificantly.
-
In this version, it is convenient to water indoor flowers, especially during holidays.

A number of the shortcomings of such an irrigation system do not spoil the overall positive picture. However, it should be understood that:
-
installing the system on large areas with open soils is not rational, since it will require a lot of time;
-
drip irrigation is optimal as a temporary measure - it is not an alternative method to full-fledged irrigation;
-
Drip irrigation from plastic bottles should not be used for irrigation on clay soils, since the devices will soon become clogged.

Manufacturing methods
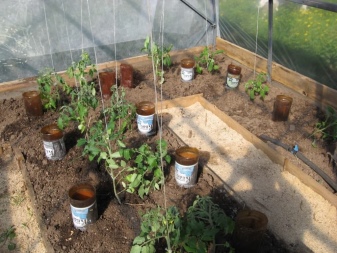
You can make a micro-drop irrigation system from plastic containers in different versions, choosing the most suitable one for your specific conditions. Homemade options are varied. The containers are dug into the ground, hung over the bushes, and placed near the plants. In this case, dispensers, watering probes and other devices are often used. The determination of a specific method is due to practical considerations, convenience, type of soil, climate and type of crop grown.

For the assembly of such an irrigation mini-complex, some components and certain tools will be useful:
-
plastic containers from 1.5 to 5 liters;
-
pieces of cotton fabric or unnecessary nylon products;
-
a spatula for creating recesses under the container;
-
yardstick;
-
a sharp metal rod or nail
-
needle;
-
a lighter or other source of ignition to light the nail.

Before starting the organization of the system, one should understand and determine the volumes of plastic containers planned for use. The specific choice will depend on the type of crops grown, since the amount of irrigation for each crop is different.
It is important to take into account the weather conditions here. In addition, the frequency of visiting the dacha planned by you will also be an actual factor.
For irrigation from above
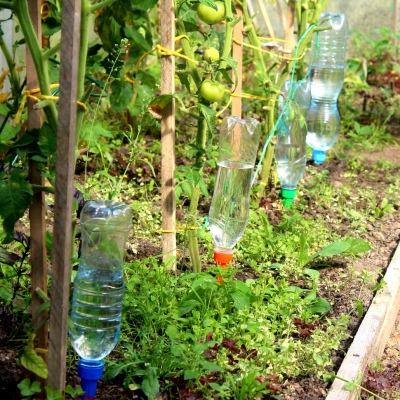
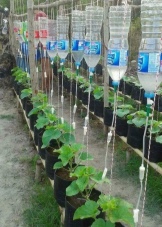
Suspended irrigation from above has proven itself excellently for greenhouses, when, for example, 5-liter containers are suspended directly above the plants. No pipe is needed here, but this method can be considered universal, since it is applicable both in the garden (above the beds) and in greenhouses, and making it with your own hands is not difficult. Advantages of the method:
-
the soil near the roots is not eroded - slow and spot irrigation is realized;
-
the water in the bottles has time to warm up;
-
in closed rooms, the optimal level of humidity is quickly achieved, and a microclimate is formed.
The irrigation container is filled with water and is attached to the support with a rope (for fastening) with the stopper down, before that a number of holes are made in the area of the bottle's constriction. They can be omitted, but simply do not close the lid of the container completely, dispensing the outflow of water in small quantities.


The disadvantage of this method is the need to mount special supports for attaching containers. Moreover, it is necessary to direct the fall of the drops so that they do not fall on the leaves of the plant, since this way you can get sunburn on them. To avoid this, the bottle (5 liters) must be strengthened closer to the ground, or special devices must be used.

The method based on the principle of solar distillation has become an original and excellent method of microirrigation. He showed himself excellently during dry periods, when there was real hell on the street. A part of a bottle with a capacity of 1.5 liters is placed on the pre-mulched soil near the bushes, and a 5 liter bottle with a cut-out bottom is covered on top of it. During heating, moisture turns into steam and water droplets. At first, they settle on the walls, but then they begin to fall down. The hotter it gets, the more efficiently the hydration process takes place.
Now you always have the opportunity to apply fertilizers to the soil, and the process of their assimilation will be carried out much more efficiently than with their typical placement in the ground. An excellent micro-irrigation method for small vegetable gardens.
Root autowatering
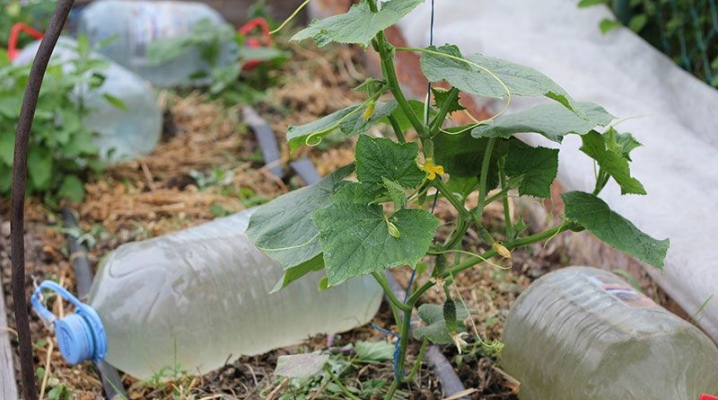
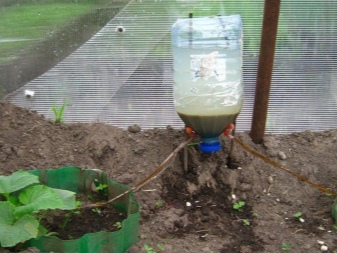
This type of micro-irrigation is organized by means of special metering devices. They eliminate the hassle of digging holes and burning holes with a hot nail, since a store bought dispenser is screwed (with the exception of 5 liter bottles) onto the neck of the container. A container with a dosing device screwed onto it is installed with its end into the ground, not far from the roots of the plant. These buried bottle designs with nozzles are good for long-term irrigation of indoor plants.

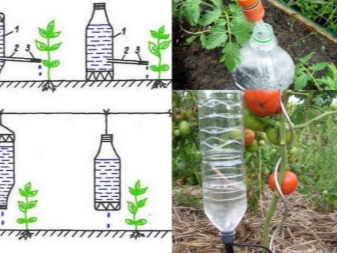
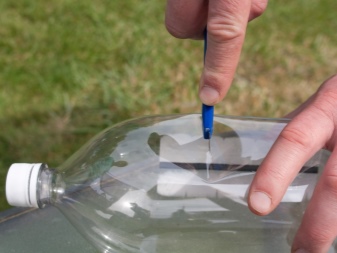
There is a modernized and cheaper root method for irrigating plants - its effectiveness is due to the use of an elementary ball-point rod, the writing end of which is cut off. In order not to bother rinsing the rods, it is better to use cocktail tubes.
One of the ends of the tube is closed tightly with a toothpick or a planed match. Having retreated from the closed edge about 2 cm, holes are pierced in it.
We make a hole in the bottle for inserting the prepared tube (by inserting the tube in the bottom area, step back about 10 cm from it), which we place in the bottle with the closed end outside. We treat the place of installation of the tube with a sealant. Then pour water into the bottle and put it in place by placing the watering end of the tube over the watering point.


The advantages of the method are that moisture flows slowly and directly to the roots, and the irrigation rate can be adjusted by changing the width of the hole. So, with a volume of 2 liters, it is quite possible to create continuous irrigation for 5-6 days, provided that in 5 minutes. no more than 10 drops will drip from the container.
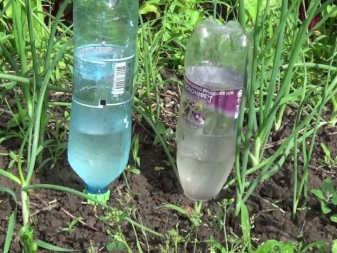
Five-liter bottles located on the side are an excellent option for organizing a long-term irrigation option. Structurally, the microirrigation system is organized as follows:
-
holes in the bottle are pierced on one side so as to cover the entire side of the product;
-
the water filling inlet valve is cut from the opposite side;
-
the container is dropped into the ground in a position on its side with irrigation holes.
We place the bottle near the roots of the bushes.

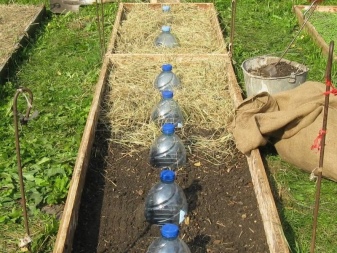
The next option is neck down. It is similar to the previous method, but here, for pouring water, not the sidewall is cut off, but the bottom of the container. Here is a sequence of actions.
-
We pierce irrigation mini-holes in the bottle along the perimeter of the entire neck.
-
You can do without this if you place a suitable piece of foam rubber in the neck of the container. This kind of dispenser will gradually pass moisture into the soil (option for dense loams).
-
The cover is closed at the irrigation holes. The bottle is dropped with the neck down.
-
In order to slow down the evaporation of liquid from the container, the cut-off bottom is returned to its original place (it may not be completely removed, but water can be poured by bending its incised part).

Micro-drip irrigation, carried out directly to the root system, is extremely productive during hot periods. There is no need to be afraid that the bushes of the plant will suffer in the sun, because direct ultraviolet light will not get into the irrigation area, and nutrients will be supplied with water directly to the roots, without affecting the leaves.
In other words, the complex is ideal for a garden, and for beds, and for home plants.
Terms of use
Practical experience, eventually transformed into a set of certain rules, will certainly be useful for beginners in gardening. As noted earlier, different containers are suitable for creating a micro-irrigation complex, but there are also secrets that we will share with you.
-
The optimal volumes of containers for micro-irrigation of cucumbers are bottles from 2 to 5 liters.
-
The values of irrigation punctures in containers should be small (1-1.5 mm) so that the liquid does not quickly flow out, but drips slowly. And this does not depend on which plant we make the sprinkler for: for tomatoes or for strawberries.
-
It is necessary to protect irrigation punctures from clogging them with earth by rewinding the bottles with unusable, worn out nylon rags.
-
The number of containers used for microirrigation is calculated by the number of bushes. The optimal ratio will be - 1 container for 1 bush.
-
Watering volumes fluctuate depending on the weather, soil types, order of arrival at the garden. For bushes growing in open areas, 3-4 liters of liquid in 7 days is enough during the growing season. At the beginning of flowering and the emergence of ovaries, plants will need up to 6 liters of water. In hot weather, productive microirrigation requires up to 12 liters of water for 3 days. Liquid consumption in greenhouses is usually increased due to its strong evaporation.
-
The best time to set containers in the ground is to start sowing.
-
The containers should be placed at a distance of 15 cm from the bushes, with a depth of immersion of the bottles in the ground up to 11-15 cm. The containers are placed both vertically and with an inclination of 30-40 degrees.


The use of containers of small volumes is inconvenient, since bottles up to 1 liter will require frequent refilling, and this will force the owners to come to the dacha much more often. A suitable volume of containers is 1.5-2 liters, at which it will be necessary to come to the garden once every 7 days to replenish containers, additional irrigation, and perform other work. If the planted crop takes up a lot of water, then you need to use bottles up to 5 liters.
It is important to understand that a bulky container will take up a lot of space, and grooves for it will have to be prepared of appropriate sizes.


Irrigation punctures made in containers are clogged with grains of soil. To prevent this, from the outside (or from the inside), part of the container where they are present must be wrapped with an unusable nylon or a piece of cotton fabric. Moisture will penetrate through such protection, but dirt will not slip through. There is another, more successful way to protect the holes. Straw is tightly laid around the container, covering the holes. This natural protection effectively protects the holes. Moreover, after winter, the straw will turn into a good fertilizer, significantly improving the fertility of the soil.


The number of irrigation holes in the tanks depends on the quality of the soil - the less they absorb moisture, the more holes should be made. So, when deepening the bottle into the hole with the neck down, 2-3 punctures are enough for sandy soils, and 4-5 for more loams.
The most acceptable puncture diameter is 0.5-1 mm, and 1.5-2 mm are the most permissible parameters; at large values, the fluid flow rate will become unnecessarily fast. If the bushes do not require significant amounts of irrigation, then one large container can be used for 2 or 4 bushes, but with a large number of punctures.


Homemade micro-irrigation is intensively used and is a great help for many summer residents. It is successfully used for processing a wide variety of crops (tomatoes, eggplants, berry bushes, flower beds). The constructive simplicity of the micro-irrigation complex is cheap; it is simple and light during installation, does not fail for a long time, and is resistant to bad weather conditions. Moreover, the method effectively preserves the roots of the bushes from both dampness and drought.


How to make do-it-yourself drip irrigation for plants, see the video.


The comment was sent successfully.