All about automatic watering from a barrel

Many owners of summer cottages and backyards want to know how to make self-watering from a barrel with their own hands for a garden. Such a system is easy to maintain and operate, it allows you to give plants enough moisture even in the absence of owners for a long time. Drip irrigation by gravity for a greenhouse from a barrel with a timer and a tap is quite easy to organize with a minimum of costs, while the future crop will be reliably protected from drought.


Peculiarities
By organizing automatic watering in the greenhouse or throughout the garden, you can solve the problem of lack of natural moisture for the entire dry season. In this case, water flows to the roots of plants in a metered manner, by gravity, its supply is carried out on a timer, at strictly allotted hours. Drip irrigation from barrels and other reservoirs was invented in Israel, where fresh moisture is especially valuable in an arid desert climate. It is not surprising that the irrigation system really works successfully, showing excellent results in the conditions of the Russian central zone.
Self-contained barrel irrigation systems are well suited for low density greenhouses.

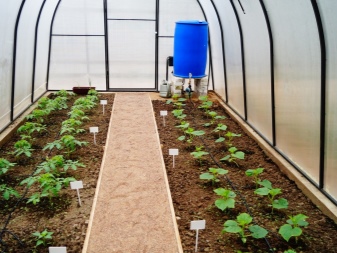
The principle of their operation is quite simple.
- Water is poured into a barrel or several interconnected containers. Depending on the system, the installation height of the tanks varies from 30 cm to 2 m.
- A filter is connected at the outlet.
- A line is diverted through which water is supplied. Dropper outlet tubes with holes made in them with a diameter of 3–8 mm are connected to it.
- With sufficient pressure, watering is carried out by gravity. If it is absent, it will be necessary to install a submersible pump to ensure the required water pressure.
- Automation of the irrigation system is carried out using a controller and a timer. The first regulates the mode and intensity of water supply. The second allows you to distribute watering taking into account the needs of different groups of plants - in this case, there can be several timers.
A distinctive feature of systems for automatic irrigation from a barrel is a drip water supply to the root zone. Plants receive the moisture they need, while there is no risk of waterlogging of the soil.


Water consumption also remains minimal, which may be relevant for dry periods or when it is difficult to organize a permanent water supply. The advantage of using tanks for sludge is the preheating of the liquid in the tank, there is no overcooling of the roots.

Device
The scheme for organizing automated irrigation from a barrel is always designed individually, taking into account the following recommendations:
- in the zone of planting large plants, the distance between droppers is from 40 to 45 cm;
- cucumbers, peppers, eggplants are supplied with dispensers every 30 cm;
- in planting greens and root crops, the distance is reduced to 10-15 cm.

It is even easier to organize an irrigation system in a greenhouse with uniform plantings. Here, pipes and drippers are laid equidistantly. The calculation of the system is done to determine the exact length of the hoses, the volume and pressure of water, since it is not always possible to organize irrigation by gravity. The number of dispensers is necessarily marked on the diagram - it will correspond to the number of landings.
The required volume can be obtained by multiplying the obtained data on the droppers by the throughput of the water supply line - this will determine the desired number of tanks.
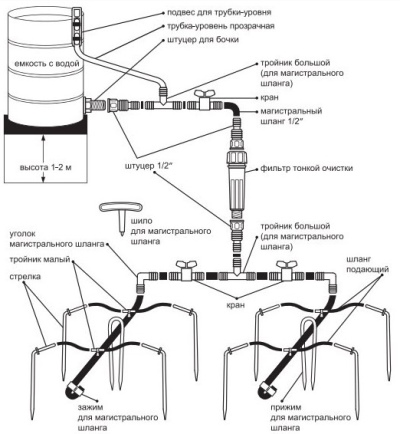
The accessories include important items.
- Barrel. For 1 m2 of area, about 30 liters of water are required. Based on this, you can calculate which barrel is needed. You can install 2-3 containers.

- Filter. It is installed between the tank and the pipeline. Provides effective screening of small debris.

- Hose or pipes for laying the line. The optimal section is 16 or 22 mm. For installation, you will have to purchase additional components: plugs, corners. The line and the barrel are connected with adapters.

- Droppers. They can be of tape or tubular design. Professional systems use dispensers in the form of spray nozzles that are placed in the holes in the water supply line. They are more economical, durable, compensated and conventional. The former can provide a given volume of liquid at any pressure due to the presence of a membrane and a valve in their design.

- Water pump. It is needed to maintain the necessary pressure in the system for autowatering. In manual control options, a barrel with a tap is used, the water supply is regulated with the participation of a person.

- Automation systems. They are available with a timer that regulates the frequency of the water supply and sends a signal to a solenoid valve. Such devices are mechanical and electronic.

This is the entire list of components used in the assembly of automatic irrigation systems from a barrel in summer cottages and household plots.
The best ready-made kits for installation
It is quite difficult to choose a suitable ready-made kit for drip irrigation in the country. On sale you can find Italian and Chinese options, as well as numerous developments of domestic agronomists. Among the assortment presented, four sets that have already been tested by gardeners deserve special attention.

Delta 3L-KP18
Complete turnkey system with everything you need for quick installation. The set includes 60 drippers - according to the number of plants, does not require maintenance, and is designed for an area of up to 18 m2. The manufacturer has provided overflow protection, you can expand the coverage area by connecting several systems together through a special adapter.
This option is distinguished by a very rich package bundle - there is no need to buy consumables.


Circle Beetle
A budget solution for organizing drip irrigation, including everything you need to connect: from a pump to a timer and drip tubes. The equipment is designed for greenhouses up to 18 m2. The advantages of the system include ease of assembly, black color of the hoses, which protects against blooming. The set is enough to supply water to 60 plants, an extended version for 80 droppers is also available.


Start LCD AquaDusya
The set with an unusual name has earned high marks from owners of personal plots. This model is universal, suitable for irrigation of flower beds, fruit trees and bushes, berry plantings. The set includes a dropper for 70 plants, a pump, a timer and everything you need to connect the equipment.
The only inconvenience is the need for an underground installation of the water supply line.


Gigant
A modern system designed for use in greenhouses or outdoors. The equipment is simple to assemble and install, and is designed for several seasons of operation. The irrigation system is enough for 74 plants, can be used in greenhouses, open ground, greenhouses. Includes water filter, droppers, clamps and mounting brackets.
When choosing a kit, it is important to pay attention to the type of water supply. Many options are designed for high pressure and require a water connection. Suitable options are marked as constant pressure systems.
How to do it yourself?
Anyone can do a simple version of a do-it-yourself drip irrigation system. It is enough to properly prepare, select all the components in accordance with the characteristics of the selected system.

The simplest kit can be done following a specific sequence of steps.
- Perform calculations. For all materials, a margin of 15-20% should be provided.
- Purchase PVC hoses or pipes with a diameter of up to 16 mm. The smaller it is, the slower moisture will flow to the root system. It is better to take opaque black or dark green hoses - algae growth is not so active in them.
- Prepare fittings. It is important that they are made of polyethylene, not metal. Rust particles clog the nozzles of the irrigation system, disable it.
- Lay the line by connecting pipes or hoses with each other, taking into account the relief of the site. It is preliminarily recommended to make holes for the droppers at the selected distance. Usually a step of 30 cm is enough.
- Install dispensers. For areas with a slope, it is better to take compensation. In any case, they should be adjustable, with fine tuning of the transmission. For 1 season, drip tapes with a thickness of 0.2-0.25 mm are enough. You can use conventional medical dispensers instead of special dispensers.
- Place the ball valve on the barrel fixed at a height. If necessary, a hole is formed under it. Then mount the filter, connect the line to the tank through it. Connect the barrel to the water supply through the fitting. If there is no such system, you will have to fill in the liquid manually.
- Form a feeding unit for mixing fertilizer with water. It contains the filter, hose and injector.
- Install a pump to generate the required water pressure. This will be needed if the height of the barrel is not enough.
- Attach a timer or controller to the system. Through it, the work process will be automated. Spring loops are enough for 24 hours of system operation. Electronic ones have greater autonomy.
A completely self-assembled system can be started, checking its performance, and adjusted.


Installation and connection
The process of assembling the autowatering system on the site with all the components is not difficult.
- Install the container. The location of the barrel above ground level depends not only on the suburban relief, but also on the length of the highway. A wooden or metal stand is erected under the barrel, the standard height of which is 150-200 cm. The container can be fixed.
- Prepare the tank for operation. Connect automatic filling by installing the appropriate fitting - it is better to immediately take irrigation containers or shower options in which such an option is provided by the manufacturer. If you need electric heating of water, an option with a heating element is taken. Several ventilation holes must be drilled in a sealed barrel with a lid to supply oxygen.
- Install the ball valve. It is located in the lower third of the tank, just after the filter. During installation, a sleeve and a seal are used to increase the tightness.
- Assembly of the highway. The main part of the pipeline has a larger diameter, the branch lines are smaller. With the help of fittings, the entire line is laid, then dropper nozzles are mounted. On the factory parts, holes for them are already provided. Homemade will have to be equipped with the necessary additional components yourself.
- A controller or timer is mounted. For autonomous work, it is better to take the option with replaceable or solar panels. If you have a connection only to the electrical network, you will have to stretch a line to the electrical appliance.
- Trial run. Upon completion of installation, the barrel is filled with water, if necessary, the liquid is heated to a temperature safe for plants. The system is started up with an inspection of the entire line and connections for leakage detection.If the pressure is too low, it is worth considering connecting a pump.

A ready-made automated irrigation system can be operated offline. If there is a long absence of the owners, it is recommended to pay special attention to the uninterrupted supply of water to the tank.


Recommendations for use
Drip irrigation is a reliable way to save water without compromising irrigation quality. But due to the small diameter of the components used here, the system periodically clogs up. To restore its throughput, cleaning is required: mechanical, manually. Particular attention is paid directly to droppers - they are disassembled, freed from contamination.

If traces of rust appear in the water, check the fittings and accessories. It is quite easy to replace metal parts with plastic counterparts without losing the strength of the connection. A damaged filter is not a problem either. Temporarily, you can put a foam insert instead. Clean it weekly.
In order to prevent foreign particles and debris from getting into the drip irrigation system, it is necessary to equip it with a sealed cover. In this case, there is no need to fear a possible blockage.

The drip irrigation system is a seasonal facility. It is completely disassembled in the fall, sending the barrel and pipes, as well as other components for storage. It is recommended to flush the system first, and then lay it down in a compact package. So the irrigation complex will successfully survive the winter cold.
For information on how to connect drip irrigation in a greenhouse, see the next video.


The comment was sent successfully.