The subtleties of the process of connecting an electric stove
The stove is one of the integral elements of our life, without which no family and no housewife can imagine their life. It makes it possible to cook food in a short time, which significantly saves time and allows the hostess to realize her culinary fantasies and ideas. But the stove can be not only gas. An electric stove is also a fairly common option, especially in multi-storey buildings where there is no way to supply gas to the upper floors. And in this article we will talk about how you can connect such a device to the power supply yourself, what kind of wire you need for this, and how the installation is carried out correctly.

Wiring requirements
The first thing to remember before starting any work at all is to turn off the power supply to the room where the stove will be installed. Modern options for electric stoves are most often implemented without wires. This can be explained not by the greed of manufacturers, but by the fact that in accordance with safety regulations, the connection of the electric stove in the apartment should be carried out using such a thing as a good terminal block, the socket should not be used. That is, a socketless connection method should be used here. Such a solution makes it possible to increase the length of the power cable, and in addition to the machine for more powerful solutions, you can install a fusible link.
To connect yourself to the power grid, you can use a cable with a cross section of 4 square millimeters, if the length is no more than 12 meters. If the wire is long, then the cross-section can be increased to 6 square millimeters. Do not forget that in this case it is necessary to separately install the machine for the device.
You can, of course, also use a plug-in connection. But then care should be taken to ensure that the device is rated for 32-ampere current. The consumption of electric stoves is quite large, which is why an ordinary household 220-volt outlet simply cannot cope with such a load. In general, if we summarize the above, then we get a list of requirements that the wiring must meet:
- to connect the device, use a 3-core copper wire with a cross section of 4-6 square millimeters, depending on the cable length;
- the installation of an RCD must be carried out;
- the plate itself should be grounded by an accessible method;
- a separate automatic machine must be installed in the electrical panel.


Connection diagrams
Imagine a plan for connecting the device in question to the power grid for a one-room apartment. Note that the standard ideas will not depend on the consumer's chosen method of connecting the device to the home network. They usually fall into three categories:
- 1-phase;
- 2-phase;
- 3-phase.


If the device is designed for 220 Volts, then the 1st solution should be chosen, and if it is 380, then the 2nd or 3rd, depending on the features. Now about the schemes in a little more detail.
Single phase
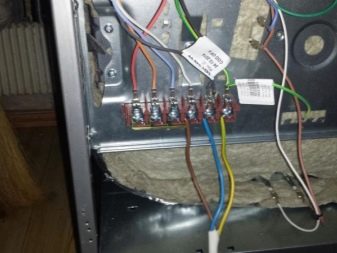
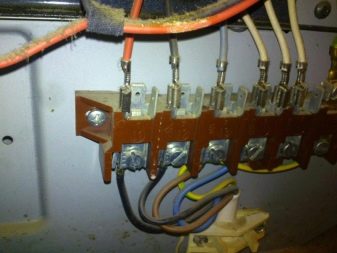
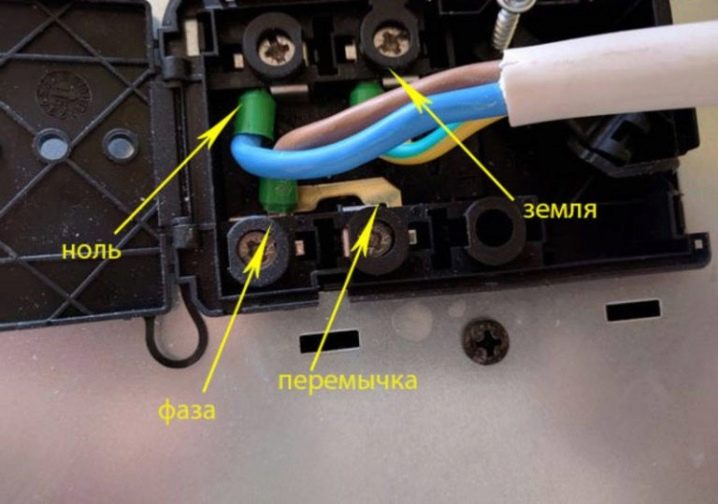
This option is implemented in urban high-rise buildings, where the wiring is usually done using 3-core wires. In order to accurately connect the purchased household appliances, you should use special jumpers made of copper and with a cross section of at least 6 millimeters. They are already in the junction boxes, as a rule.If they are still not there, then it will not be difficult to buy them in stores where they sell various electrical goods. The connection should be performed according to the following algorithm:
- first, you should connect screws 1-3 with the letter L;
- The 2nd bus should connect the bolts 4,5, which are marked with the letter N;
- the screw that remains free with the designation PE will be used for the earth connection.


The wires themselves should be distributed as follows:
- black or brown represents the phase. It is he who is needed to connect to the terminals marked L1,2,3;
- blue, representing zero, is attached to the numbers 1, 2;
- green, which is the ground, is attached to the same terminal.


This algorithm cannot be varied in any way, and you only need to place the wires in such a way to do it correctly. These norms are fixed precisely by the rules for the operation of electrical networks.
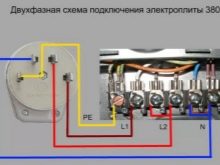
Biphasic
This option is usually used in private buildings, but it can also be used for an apartment if the wiring is made of 4-core wire. Then the jumper will be placed between bolt number 1 and L1, the second between bolts number 4-5, and bolt L2 for grounding must remain free. Then the connection of the wires will be carried out according to the following instructions:
- red cable - to terminal with number L3, phase C;
- the green wire is your normal standard ground;
- the yellow cable must be connected to the terminal jumper L1 and L2, it is phase A;
- the blue winding will be a jumper between zero terminals # 4 and # 5.


It is important to remind here that the plug for this type of connection must be used with 4 pins.
Three-phase
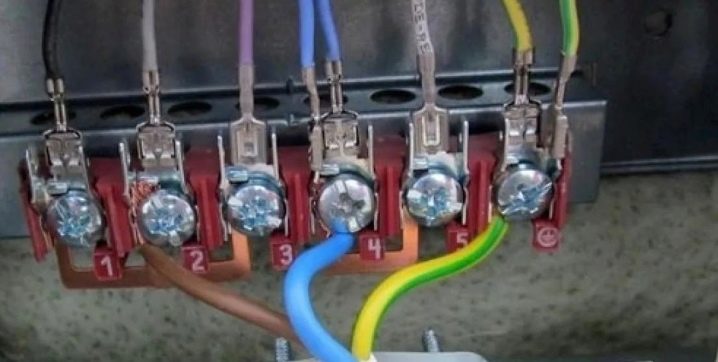
This type of connection is used exclusively in private houses or buildings that were built a long time ago. In modern housing, it is used very, very rarely. Outwardly, this method, at first glance, is complicated, but in reality it is completely wrong if all the necessary recommendations are implemented. In the mounted version, a wire with an unusual cross-section is used, where there are 4 or 5 cores. Therefore, only one core is used for zero terminals numbered 1 and 2. The cores must be connected according to the following algorithm:
- phase A is a yellow wire that must be connected to pin L1;
- phase B is a green cable that should be connected to L2;
- phase C is a red wire and connects to L3;
- phase N is a blue wire and goes to the zero contact bus;
- ground wire goes to a similar terminal.

In general, it should be noted that Before choosing your connection option, it would be best to consult a specialist electrician so that you do not make a mistake. And before directly switching on the electric stove and installing the oven box, you should check the connection of all burners so that a short circuit does not accidentally occur somewhere. When the stove is installed, it remains to be turned on, and the special indicator that is on it should notify about its correct operation. An ordinary hob will also be connected.

Preparatory stage
Now let's move on to the preparation and subsequent connection of the equipment in question. Before starting direct connection and working with electrical wiring, you should choose the right place for the stove. There are the following rules on how to do this:
- the place where it is planned to install the stove must be level so that when adjusting the legs, its stable and stable horizontal position is ensured;
- the length of the wire should be made with a margin so that, if necessary, you can easily move household appliances away from the wall without removing the plug from the outlet;
- the device should never be placed close to the refrigerator, due to the fact that a hot burner can have a temperature of up to hundreds of degrees;
- if the stove is built into a kitchen wall or set, then the panels made of plastic should be protected from overheating during the operation of the electrical appliance;
- it is better not to place other electrical appliances next to the induction-type stove - the electromagnetic field can adversely affect their operation.


Also, when choosing a place for installation, an important factor may be the presence of a hood, which should be above the stove or behind it, depending on the hood model.
To carry out the work, you will need to have the following materials on hand:
- 3-core cable, the section of which will be 4-6 millimeters. This will depend on the length;
- separate machine for the dashboard, in order to correctly connect the equipment. Must be either 32A or 40A, depending on wire gauge;
- RCD, which should protect the equipment from overloads.

The last two points are considered mandatory components of the connection process of the device in question, regardless of the manufacturer. It is they who will save the equipment from combustion due to voltage drops that can be observed in the city's power grid. It's kind of a switch. If the builders have removed only a 3-core wire, then for the installation of a special socket or terminal box, it will be necessary to make channels in the wall in order to deepen the cable. These works will require some skills and will take a lot of time, but as a result, the interior of the room will not suffer, and the cable will be inside the wall. True, first you need to decide what would be better to do:
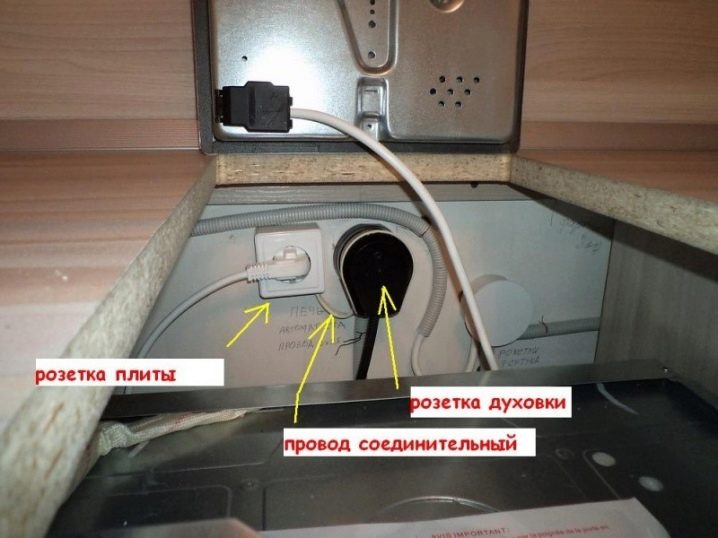
- connect everything directly;
- mount the outlet;
- mount the transfer case.


If you do not know what to choose, then you should consult a professional. Direct connection is considered the safest, because the absence of unnecessary cables significantly reduces the risk of overheating of the device. In new high-rise buildings, the situation is the simplest - the builders simply leave the cable with insulation, and the residents themselves decide what to do. The solution through the terminal box, if there is no plug on the cable, is also possible in new houses.
The box is usually placed on the kitchen wall at least 0.6 meters from the floor, and the stove is installed at a distance of no more than a couple of meters from it. As a rule, it is made of metal or very durable plastic, and is covered with a lid on top.


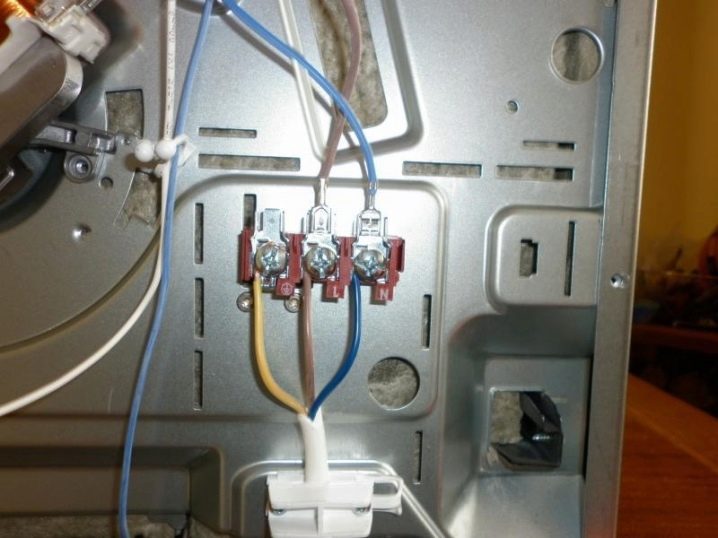
It should be noted that there is already a connection to the home power supply inside. You just need to find out how you can connect the electric stove. The circuit is very simple: the black cable is the phase, the blue is the zero, and the yellow is the ground. All 3 cores are connected to the box, color-coded. Then it remains to check the tightening of the connection screws and close the cover.


Another way to connect is through an outlet. There are three categories of outlets on the market now:
- Belarusian;

- Russian;

- European.

In the Russian version, the grounding wire is located on top, its input is rotated 90 degrees to 2 other holes. When working with a Belarusian socket, the contacts are rotated 120 degrees. A feature of the European socket is the presence of two contacts with a circular cross-section, and the grounding will have a flat cross-section and be located at the bottom. But this option is considered obsolete. If it makes no sense to create wiring, then the mounted outlet just needs to be checked with a special device to find out the phase.

How to install it yourself?
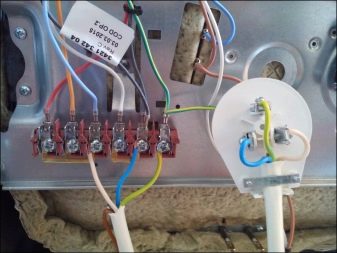
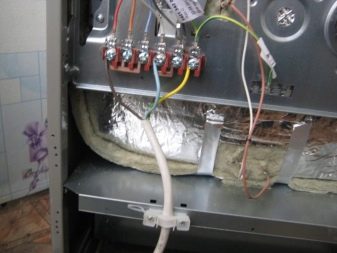
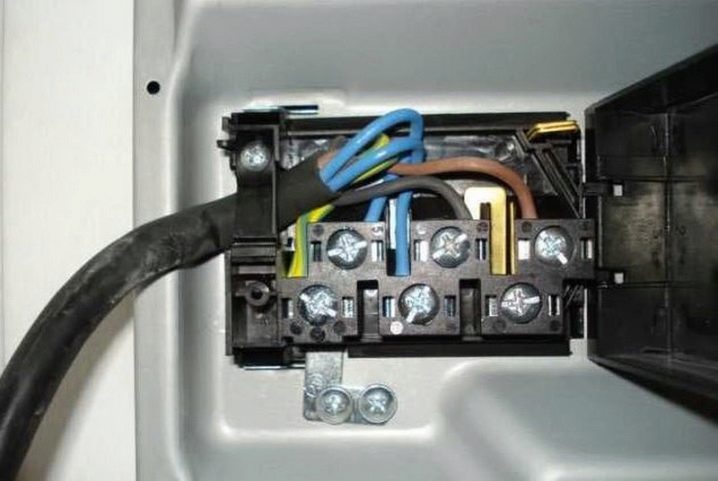
All of the above options are for a 220 Volt network with one phase. To make the connection, as already mentioned, you will need to have a 3-core cable, 3-pin power-type sockets and a plug with a rated current parameter of at least 32 amperes. The connection of plates from various manufacturers will not differ from each other in almost nothing. Now let's move on directly to the installation process of the equipment in question. First, the selected wire for connection must be connected to the device.At the back, in the lower part, there is a terminal box, where the conductors are usually brought out. There should be plans for connecting a variety of networks nearby.

If we are talking about a 220 Volt solution, then the circuit that is most extreme on the right side is required. According to this diagram, contacts with numbers 1-3 should be connected to each other by a jumper on the equipment - this is a phase. This is usually a brown or red conductor. The second - pins 4-5, will be neutral or zero. This is usually a blue or light blue wire. The sixth contact will be "ground" - yellow-green or green cable. The electric stoves come to the store with the jumpers mounted, but it doesn't hurt to double-check it.
It will not be superfluous to crimp the conductors with contact-type plates, and then connect. This solution is safer, but more often than not, they are simply screwed around the hold-down bolt and then tightened. Color coding should be observed, because then the probability of error will be less. Now you need to connect a plug to the wire. All power plugs are collapsible. To disassemble them, you must unscrew a couple of bolts of the fasteners and dismantle the cover with contacts.
Now we dismantle the fixing film that holds the wire. From the tip of the flexible cable, about 5-6 centimeters, we remove the insulation, which serves for protection, after which we straighten the conductors and clean their ends from the insulating material by about 1.5-2 centimeters. We put the end of the cable that has been cut into the fork body.
The clamping bolts on the contacts must be loosened, and the conductors, consisting of many strands, must be twisted into a bundle. These harnesses should be screwed around the contacts and tightened with bolts.
The distribution of conductors will be important, therefore, the issue of their connection must be treated with maximum attention. The upper plug contact, as a rule, is signed - the green wire should be connected here - "ground". And when the socket is connected, "ground" is supplied to a similar connector. The remaining contact pair is the so-called phase and zero. Here, joining does not really matter where and what. It is only important that when the outlet is connected, the phase must fall on the corresponding connector, like zero, otherwise the circuit is ensured.
Before starting the process, everything should be checked again whether the zero with the phase is correct.
If suddenly the stove was already and there is a socket, then you need to find the location of zero, phase and ground and just connect the cables in the plug. It is easier to determine all this using the voltage indicator that is present in the indicator screwdriver. It is very easy to use it - just put the indicator to the expected phase, look at the diode located in the device. If it is active, then the voltage is present and then it is a phase. If it does not burn, then, accordingly, there is no voltage and we have zero in front of us. And the "land" is easier. This contact is either from below or from above.
Now a little should be said about connecting to a 3-phase 380 volt network. If such a connection is necessary, then it is imperative to purchase an automatic machine and a special RCD for a 3-phase network. The wire must also be different, namely 5-wire. That is, a socket with a plug must have 5 contacts. The very same connection algorithm does not differ from that described above, with the exception of the number of cables. The only difference will be when you connect the wire to the output electric stove terminals. Only 1 jumper should be put on contacts with numbers 5-6, while others will be connected with different conductors.

Both ground and zero should be tracked. Matching the conductor colors on the phases will also not be superfluous, since it is simply convenient for repairs. In general, as you can see, there is nothing difficult about connecting the devices in question to the network. Although in some cases it will not be superfluous to consult with a specialist in connecting such equipment.
For information on how to properly connect the electric stove with your own hands, see the next video.


The comment was sent successfully.