Growing pepper from "A" to "Z"

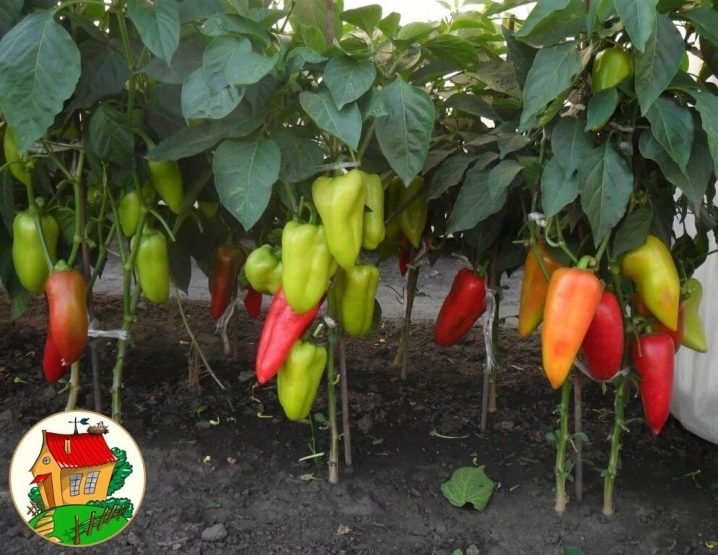
Bell peppers are an excellent vegetable with tremendous health benefits. Peppers of different types and varieties are widely grown in open ground and greenhouses for themselves and for sale. However, newcomers to the gardening business do not always know how capricious this culture is. Therefore, it is better to find out the features of its cultivation in advance.
How to grow seedlings?
Bell peppers are grown using the seedling method. For this, both varietal seeds, collected independently, and hybrid specimens purchased at the store are suitable. Let's analyze the cultivation of seedlings from "A" to "Z", because this is the first step towards obtaining a high-quality harvest.
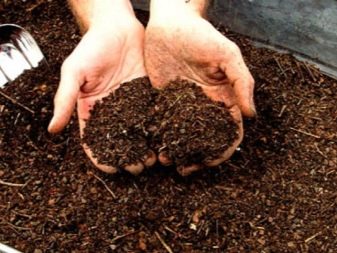
Before sowing seeds, you will need to prepare the soil and good containers. If you are just starting to master the garden craft, then it would be advisable to buy ready-made soil for nightshades. Those who have experience usually prepare it themselves, mixing humus, peat and garden soil (3: 5: 2). Such a substrate is necessarily calcined, and not just before planting, but two weeks in advance, so that beneficial bacteria are regenerated in it.
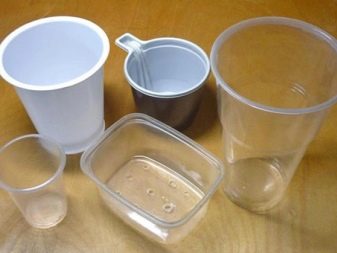
Next, we select containers. The best option is peat pots, but this is a rather expensive container. You can just use ordinary plastic glasses or containers from yogurt, desserts. The container is thoroughly washed, then poured over with boiling water. If you've used it before, a manganese treatment will be required. After disinfection, holes are made, but not on the bottom, but on the sides, one and a half centimeters from the bottom. This will moisten the culture more efficiently.
It is worth noting that it is not customary to grow pepper seedlings in a large container, since this culture responds negatively to picking.
After selecting containers and soil, the gardener prepares the seeds. In order for the seedlings to grow well, the seed must be calibrated by selecting the smoothest grains. After that, a teaspoon of salt is stirred in a glass of water, and the seeds are dipped into this composition. In a couple of minutes, the unusable samples will float to the surface. The remaining grains are washed and dried, and then dipped in a disinfectant solution. It can be manganese or Fitosporin-M. The duration of the procedure is 30 minutes.
Next, fold the cheesecloth, spread the grains on it, and cover them on top with the same cloth. Put on a plate, add water. Moisturize regularly for 10 days until sprouts are seen. As soon as they hatch, the grains begin to harden. This will take several days. Hardening is as follows: the seeds are placed in the refrigerator for 12 hours, then they are allowed to spend the same amount of time warm. Next comes the refrigerator again, and again it's warm.


Planting germinated seeds in a container is as follows:
- clean containers are 3/4 filled with earth;
- watering the soil with a very weak manganese solution;
- form pits one and a half centimeters deep;
- they lay grains there, sprinkle with soil on top;
- after light tamping, planting is irrigated;
- cover with foil;
- taken out into a room with a warm microclimate.

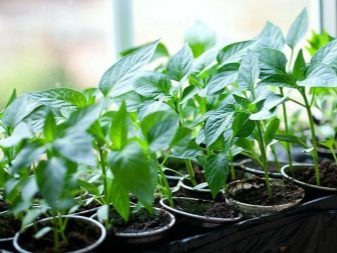
Further, containers with grains are also not disregarded. Until shoots appear, you need to open the shelter for a short time every day in order to ventilate the plantings and check the moisture of the soil. As soon as the sprouts hatch, the film is removed, and the container is placed on a lighted windowsill.In order for the seedlings to grow healthy, it is necessary to provide them with the right conditions and take good care of them. So, the temperature in the daytime should be about +26 degrees, and at night - + 10-17. If it's hot all the time, the seedlings will stretch out a lot.
Daylight hours for sprouts should be at least 14 hours. Natural light is likely to be scarce, so it is better to buy phytolamps in advance. It is convenient to water from a sprayer, so the water will not wash out the soil. The temperature of the liquid is about +30 degrees, and it should be settled. Water as needed. You also need to take care of air humidity. If the house is too dry, you can buy a humidifier, or put a couple of plates of water next to the seedlings. In 10-14 days, it is worth starting hardening of the bushes.
Move them to fresh air, increasing their time there a little every day. However, always keep an eye on the weather. Seedlings should not get caught in rain or cold weather.

Timing of landing in the ground
Pepper should be planted in open ground only after the ground warms up to 15 degrees Celsius. Otherwise, you will get a small harvest. The timing is different for each region. To make it clearer, it is worth considering the table of recommended planting times.
|
Plot |
Middle lane |
Southern zones and places with a temperate climate |
Siberia, Ural, Leningrad region |
|
open ground |
the end of May |
last days of April |
June 1-10 |
|
polycarbonate greenhouse |
first days of May |
after April 15 |
mid-May |
|
heated building |
mid or late April |
from March 25 to April 5 |
May 1-10 |
|
greenhouse made of polyethylene |
after May 15 |
after mid-April |
last days of May |

Preparation
Before planting pepper on the site, you need to carry out some preparatory measures.
Seat selection
Both the greenhouse and the open field should be lit all day. Even a little shading is detrimental to bell peppers. Cold drafts should also be avoided.
So that the bushes in the open field are not blown out, it is necessary to protect them with tall trees and plants around the perimeter. But the shadow of these objects should not fall on the pepper.
When choosing the best site, you need to remember what grew on it last year. Excellent predecessors will be:
- cucumbers;
- cabbage;
- onion and garlic;
- legumes;
- pumpkins;
- zucchini;
- carrot.
You can not plant peppers after:
- potatoes;
- tomatoes;
- strawberries;
- eggplant;
- tobacco.


Planting material
Seedlings do not have to be prepared in any special way. It only needs to be hardened by the time of disembarkation, accustomed to new conditions. Besides, in a couple of hours it is necessary to water it so that the earthen lump easily comes out of the container. This rule does not need to be followed if you have peat pots.
The culture is planted when it becomes 20 centimeters in height, has about 10 leaves.

The soil
Pepper grows very well in light and nutritious soil. The looseness of the substrate is one of the main conditions for the comfortable growth of culture. You can choose sandy loam or loam. Prepare the soil in the autumn months. They dig it deeply, clean it of all that is superfluous. And also necessarily supplement the substrate with fertilizers: nitrogen (20 grams), potassium and phosphorus (40 grams). The dosage is calculated per square meter.
If the soil is sandy, then in the fall you need to add clay or organic matter.
Please note that organics are not added along with minerals. Clay soils are enriched with peat or sand. Dolomite flour is added to acidic ones.

Arrangement of beds
The beds for bell peppers begin to form about a day before the planting of the bushes. Landing holes are dug on the site. They should be 10 cm deep. If the pepper is tall, then 40 cm is left between the holes, and 70 between the rows. Low-growing bushes will be planted according to the scheme of 30x50 centimeters.
If the vegetable is grown outdoors, then it will definitely have neighbors. And gardeners often plant something in the greenhouse in order to save space.Pepper will feel great next to onions and garlic, white cabbage and cauliflower, carrots, radishes, salad, zucchini. Several dandelions and nettle bushes can be planted nearby. Even though they are weeds, they will stimulate the peppers. But there should be only a few of them. Other good neighbors are parsley, basil, marigolds, thyme. But next to fennel, dill, potatoes, tomatoes, eggplants and legumes, the development of pepper and the yield will be halved.

How to plant correctly?
Growing seedlings is only the first stage in the cultivation of peppers. Now it is very important to properly plant them in the ground. Let's look at the process step by step.
- Water the potted plants well in a couple of hours. Peat can not be watered.
- Spill the holes with two liters of water, and put a handful of ash inside.
- We take out the bushes from the containers, carefully place them in the center. Sprinkle with earth, without deepening the growth point.
- We tamp the soil, water it, lay out the mulching layer.
- We place it along the perimeter of the arc, tighten it with polyethylene. We close the planting, shading from the sun. We remove the shelter in July.
Important: sweet pepper bushes should not be placed next to bitter bushes. Otherwise, the fruits will taste bitter and burn. And their seeds will lose varietal characteristics.


Care
Growing bell peppers is not easy, especially for beginners, but even they can cope if they take into account all the necessary stages of agricultural technology and the advice of experienced gardeners. Let's see what technologies and practices are recommended to get a good large harvest.
Watering
Pepper tolerates drought well, but it also loves water very much. The main thing is not to water in excess, so that the roots do not start to rot. For the first time, it should be watered 10 days after planting, then every 5 days. Young bushes will require 1-1.5 liters, adults - twice as much. In this case, a warm liquid is poured under the root so that it does not fall on the foliage.
It is best to organize drip irrigation.

Top dressing
Peppers growing in a greenhouse or in a vegetable garden must be fertilized. The first feeding is always nitrogen, it is carried out 2 weeks after planting the seedlings. To do this, you can take urea (urea) or organic compounds like rotted manure or chicken droppings. And also recently planted peppers can be fed with ammonium nitrate.
Further, feeding is carried out every 15 days, using minerals for this. Ammonium nitrate (10 grams), superphosphate (30 grams) are diluted in a bucket of water. You need 5 liters of product per square meter of beds. When the plants begin to bear fruit, you can dissolve ammonium nitrate (10 g) and ash (0.2 kg) in 10 liters, water the plants with this composition. Succinic acid is also often used for fertilization. It can be used on poor soils, as well as if the peppers were not particularly tasty last season. It also boosts immunity well.


Loosening
It is worth weeding and loosening the soil a day after watering or precipitation. You do not need to penetrate deeply into the ground, as this can damage the roots. Surface loosening will be sufficient.
Please note that the first procedure is carried out 10 days after planting, not earlier. After loosening, the mulch layer must also be renewed.
As for hilling, each gardener decides for himself whether he needs it or not. There are a lot of opinions. Some believe that it is necessary to huddle, while others remember about the surface system of bushes. In any case, peppers are most often huddled in the open field. The procedure is carried out when the plants grow up. At the first hilling, a mound of 8 cm is made, at the second (during flowering) - 10 cm, and at the third (formation of ovaries) - 16 cm.

Shaping and pinching
It is necessary to form tall and medium-sized varieties. Those that are too low do not need such procedures. When the plant grows to 0.3 m, the top of it must be pinched. Next, they find the first fork and shape it so that 2 of the most powerful shoots remain. At the next forks, about 3 shoots are left. Plants need to be grazed every two weeks, and if it rains often, then once every 8 days. All treatments are performed early in the morning.
In addition, tall varieties are tied to supports, which are placed at the planting stage. You need to tie up all the bushes. And also on adult plants, the lower leaves are removed so that the sun can freely penetrate to the soil.

Diseases and pests
Peppers with mistakes in care are often exposed to diseases. If the leaves turn yellow, the bushes are probably sick with fusarium. You can process such bushes with "Fundazol". It does not cure the disease, but inhibits its development. You will have time to collect the fruits from the bushes. Brown spots on the foliage indicate fusarium. It is desirable to use "Quadris" here. The light mosaic pattern is a foliage mosaic. It is pointless to treat, there are simply no drugs for such a disease. Better to dig up infected specimens. Gray spots with a bloom are a sign of gray rot, a dangerous disease that loves moisture. For processing, use "Speed".
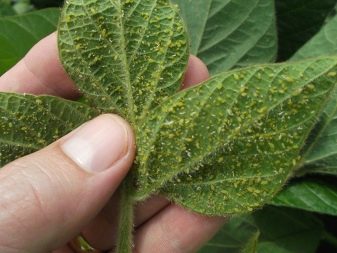
Aphids are tiny insects that reproduce at a tremendous rate. It sucks the juice from the leaves, even eats the tops when dominated. At first, spraying with infusion of garlic, tomato tops is carried out. With a large number of insects, they use Aktara. A thin web on the foliage will indicate the appearance of a spider mite. It can be destroyed with Apollo insecticide. Slugs are chased from the beds with crushed eggshells or coniferous needles scattered around the bushes.

Possible problems
Growing bell peppers bushes, the gardener may face some problems. Let's see what needs to be done in such cases.
- Does not bud. The reason is nitrogen overfeeding. The solution is to completely eliminate such dressings.
- No ovaries. They do not form in high humidity, heat or cold. If conditions cannot be regulated, use Ovary.
- Flowers are falling. There are several reasons for this. One of the main ones is the same excess of nitrogen. The second is a cold snap or sudden changes in temperature, watering with cold water. Check these moments.
- It is developing poorly. It so happens that peppers develop slowly or do not grow at all. There are a lot of reasons. First, check the soil to see if the acidity level is normal. Then pay attention to the temperature. Pepper inhibits growth when it drops below +13 degrees. If everything is in order, we look at the appearance. A brown border on the foliage indicates a deficiency of potassium, and the plates stretching upwards indicate phosphorus. If the leaves are light, this is a lack of nitrogen. Use compound fertilizers.
- Bitter. Bell peppers become bitter only in two cases: poor watering and close location of bitter pepper varieties. Both moments are very easy to control.
- Doesn't blush. If you bought a variety of red pepper, and it is stubbornly green, then the reason should be sought in the following: cold, high acidity, watering with cold water, insufficient lighting. After checking each item, you will surely find what the problem is. You may need to cover the plants and place hot water bottles next to them to warm the bushes. If it's too hot, you need to take care of mulch and removing the bottom foliage. Sometimes the foliage of the peppers also turns red. This most often occurs when there is a lack of phosphorus. But it can also signal low temperatures and poor soil.
- If the bushes are burnt in the heat, they must be shaded, and then watered with potash fertilizer. After 21 days, the affected specimens are watered with a urea solution.


The comment was sent successfully.