How to properly glue the ceiling tiles?
When funds do not allow for a multi-level ceiling design or there are budget constraints, ceiling tiles are used. This material is unique: with its simplicity, it allows you to update any interior without much effort and the involvement of repair teams.
You can make the tiles on the ceiling yourself: it will not take much time, and the result will look quite professional.


Peculiarities
Ceiling tiles are predominantly square-shaped fragments of various sizes (about 50 x 50 cm) made of natural and synthetic materials. If earlier they were exclusively white, today on store shelves you can find blue, beige, pinkish, milk tiles, as well as options with a colored pattern. This material, folding into a monolithic canvas, forms different patterns that give the space of any room elegance and comfort.
The ceiling tile differs in the surface texture. It can be matte and glossy. The material is unique in that some of its varieties allow surface staining. Thanks to this, there is no need to re-glue the cladding if the surface is dirty. For renewal, it is enough to roll it with a paint roller or spacril. So you can maintain a beautiful and fresh appearance of the ceiling for up to 10 years.


A distinctive feature of the material is sound insulation: ceiling tiles make the room warmer, reducing extraneous noise from neighboring apartments. It doesn't matter what its thickness is. Depending on the type of material and its density, these raw materials need to be handled carefully and carefully. You need to glue such a tile carefully, otherwise at the time of pasting the ceiling, you can deform the fragment, leaving unsightly dents on its surface that are visible to the naked eye.
When working with tiles, the possibility of breakage is not excluded.therefore trimming must be done with a sharp tool. If there are jagged edges on the cutting blade at the time of trimming, the material may chip, which can cause the corner to break off. Dirty and rusty tools must not be used in the work: they can lead to contamination of the glued fragments, which is especially noticeable in the overall picture of the cladding. Even the cleanliness of the hands matters: they will have to be constantly washed, since the adhesive composition gets on them during the finishing process. It is unacceptable for it to hit the tile, this will be noticeable, since not every adhesive can be removed from the surface perfectly.


To finish the ceiling, you will have to buy material with a margin: this will eliminate the lack of panels in the event of a marriage or improper cutting when fitting.
It is worth considering such a feature of the ceiling tile as shrinkage, which is provoked by two factors: its density and the glue used. Not everything that manufacturers advertise is suitable for sticking. Even the opinions of the masters differ. However, the fact remains: ideally aligned corners diverge a few minutes after gluing to the surface, which complicates the fitting of further fragments and forces you to first mask the joints and then paint the surface. This is especially noticeable with a non-standard installation method.
Unsuitable adhesive can be seen through thin tiles. This is especially important if opaque material is used for work.Shrinkage is characteristic mainly of loose panels: thin varieties are more resistant to it. At the same time, the pattern is often deformed at the joints (this is especially noticeable at the seams).

Panel types
Ceiling panels are classified according to production method, type of surface, shape, material of manufacture and size. Thanks to these features, you can visually change the area of space, beat the surface irregularities. Today, these panels are made from synthetics (foam), wood and even metal, although it is rarely used for decoration. The disadvantage of many varieties is low resistance to combustion, although the manufacturing technology provides for the impregnation of the material with a special compound that prevents combustion.


Manufacturing method
According to the type of production, ceiling tiles are divided into 3 types:
- Stamped - material created by pressing foam blocks with a thickness of 6-8 mm (rather fragile material with no protective layer and instability to dirt, used due to its low cost);


- Injection - a variety formed by sintering in a mold with further processing at high temperature, having a thickness of 9-14 mm (polystyrene foam category with high indicators of relief and pattern clarity, capable of imitating stone, marble, wood, tile and ceramic tiles, numbering in assortment category for painting);


- Extruded - a category, the creation process of which is associated with the pressure of the extruded polystyrene foam strip under the press, it is characterized by high quality indicators in comparison with the two previous types of finishes (it is strong, reliable, durable, hygienic and capable of restoring its original shape if it is deformed, glued and cut much easier).


The latter category is treated with a water-repellent impregnation during the production process. Its docking is easier, as it allows you to create a monolithic type of surface without visible joints.
Surface type
By type of surface, ceiling tiles can be:
- laminated;
- mirrored;
- seamless.
Laminated material is distinguished by the presence of a special film on the surface - lamination. This feature makes the finishing panels moisture resistant, durable, and resistant to fading. Due to the laminated film, this ceiling tile has a different shade. The mirror version is a design option: it is mainly a plastic tile, on the surface of which there is a mirror layer. This option, in addition to the square shape, is rectangular. The seamless type of raw material differs in that when pasting, no seams are visible, while the tile can have classic linear borders or curly lines. It is durable, thermally stable, does not lend itself to moisture, is practical and can be painted on the surface.


Shape and dimensions
These criteria are especially important: it depends on the amount of consumables. The calculation formula is quite simple: measure the length and width of the ceiling, multiply and divide by the number of square meters of material, based on the number of fragments in one package. Typically, a factory-packaged 50 x 50 cm block consists of 8 blanks. This is, in fact, 2 sq. m.
This parameter is the most popular, although in addition to it, there are other standards in production, for example:
- 30 x 30 cm - for small spaces;
- 16.5 x 100 cm - for lovers of non-standard techniques.
The inconvenience of calculating a rectangular tile is the need for a symmetrical fit of the pattern, otherwise, due to an incorrectly positioned pattern, the ceiling may look visually skewed. In this case, it makes sense to glue with a shift.

Choosing glue
The correct adhesive is the basis for successful work. Often it is he who slows down the process.Some types of adhesives are enough to attach to the ceiling, they set quickly. Others will have to be fixed by pressing the surfaces for a while. At the moment, several varieties of tile adhesive have been proposed for ceiling tiles. It can be transparent, white and beige. The structure is also different. Consider a few:
"Titanium"
This glue is divided into 2 types: one of them is transparent, sold in bottles, has a specific smell. Its disadvantage is the viscosity of the structure. Application is inconvenient in that the adhesive stretches, forming threads, which distracts from work.


This does not stop some craftsmen: they believe that this glue is suitable for work and does not deteriorate if the neighbors from above have a leak or a pipe burst.
The second type is distinguished by a light beige color. It is sold in plastic cans and has a creamy texture. This product may cause seam inconsistencies. Despite the seller's advertisement, it "eats" the material as soon as it hits the surface, which leads to shrinkage of the ceiling tile. Even if dense and thick tiles are used in the cladding, beige glue spots will show through it.


Liquid Nails
This material is sold in the form of a tube and a bottle for a construction gun. The best quality goods are produced by the Moment trademark. This adhesive is characterized by excellent adhesion to the surface. It will take a few seconds to glue the tiles. However, the very fact that it instantly grasps can make it difficult to work: it can be problematic to correct the fragment glued to the surface, because the grip of the material is especially strong.


If a bottle for a gun is used in the work, you will have to work quickly so that at the time of solidification the tile is already on the ceiling. Another nuance is the color of the glue: it is dirty beige. Such a minus calls into question the use of glue when processing the ceiling with thin fragments that do not require painting. This glue is expensive, it is produced in a small volume, so the lining of the ceiling of the room can cost a lot. It will be difficult to remove it in case of dismantling.
"Quart"
Super white adhesive for ceiling tiles of this brand is available in different volumes in plastic cans. For work, it is optimal to choose a package with a volume of 3 kg. The color is similar to the white color of the tiles, the consistency is reminiscent of sour cream. In the work, the glue has proven itself from the best side. The tile applied to the ceiling lays down in place, does not slide off it, does not lag behind the surface after it has been pressed down in the places of the applied glue. This glue is convenient in that it can be used to fill the joints, if suddenly there are voids. In color and type of surface, it is similar to the main matte cladding, the processed seams will not be conspicuous, while the surface of the finish will look monolithic.


Surface preparation
Before pasting, you first need to prepare the base of the ceiling, otherwise the work runs the risk of being short-lived. This is especially true of places where the ceiling was whitewashed with lime. It must be removed from the walls, because the tiles will not stick to the whitewashed surface. If, for some reason, dirt or greasy stains get on the ceiling, they are cleaned off.
Not only whitewash is removed: it is necessary to cope with the plastered surface.
This also applies to wallpaper, if they were pasted over the ceiling. To clean the horizontal plane of them, you can use a regular spray bottle for flowers and houseplants. This will reduce the amount of dust when removing the old coating. The tile fits perfectly on the concrete base, although it is often impossible to reach it during cleaning. Do not ignore the preparation process before gluing: it is possible that the whitewash or old wallpaper will move away from the ceiling and the tiles may sag against the background of others.


If the ceiling is uneven, has significant cracks, they should be covered with putty or gypsum-based rotband. Then it is necessary to prepare the surface for gluing with a deep penetration primer. This mark is indicated directly on the container, thanks to which the composition will ensure reliable adhesion of the ceiling panel to the ceiling surface. Priming can be done with a roller and flat brush. At the same time, a roller is used in the main space, with a brush they pass along the corners and protrusions in order to exclude an overspending of liquid (if you use a roller, in the corners, when pressed, the primer will flow along the walls). It is necessary to process the ceiling of the room with high quality, then it is worth waiting a day until the composition is completely dry.


Subtleties of installation
Ceiling tile installation is quite fun and fast, so many people do the gluing with their own hands. However, the work has its own nuances. She does not tolerate hack-work and haste: loosely connected tiles can fall out of the common canvas over time. It is worth considering the features of the material used: plastic tiles (PVC) do not allow pressure to achieve the density of the web, the porous material can be compressed somewhat if necessary for alignment.
Gluing provides different ways of fixing fragments. Each of them depends on the skills of the master. Calibration must be performed before gluing the material. This is especially important if you plan to start work from the center of the room obliquely. This factor is one of the most important when buying material and taking into account its stock: out of 50 pieces, 8 will definitely not fit in size. This is due to the packaging itself: often the fragments on the sides have smoothed and obtuse corners.

When buying, it is impossible to wrap the packages with adhesive tape, squeezing them: the side seams suffer from this.
The batch of goods also matters: often the blanks differ by 3-4 mm, which complicates the sticker. Taking as a basis the most high-quality square (rectangle), others are equalized by it: this way the pasting will be flawless. Before gluing a new piece, attach it to the previous one. This will allow you to find the perfect joint. After fitting, the element is glued to the surface. It is important to constantly check the direction of the drawing. This will avoid marriage.


You do not need to apply glue to the ceiling: it is enough that it will be on the tile itself. It is applied pointwise, since the material is quite light. You can apply glue in the corners, in the center, in the center of each face. In general, 5-9 dots are sufficient with a little glue. To make the tile look monolithic against the general background, and the glue does not give it tuberosity, use a rubber roller for rolling wallpaper: this way you can avoid punching the blocks and even out the level of the cladding, especially at the crosshairs of the fragments (if there is no large relief).
If, in the process of work, a fragment with a dirty area is found in the package, which is not enough for gluing in the corner, it is worth using it as a pattern for especially difficult places (for example, where pipes or protrusions are located). So you can save on marriage and fit the shape of the missing fragment as accurately as possible. If special coloring is planned (for example, one embossed element of the picture), this is done before gluing. If the entire surface is painted, it is better to do this after the finishing cloth is dry.


Sticking schemes
You can glue the tiles beautifully in different ways.
There are several options for gluing, for example:
- parallel to the walls (along the perimeter);
- diagonally (obliquely with alternation and intersection);
- staggered.
To exclude skewing of the picture, they make a rough outline of the center. To do this, they find the middle of each wall near the ceiling, glue the thread to the tape and form a crosshair. If you plan to work with tiles diagonally, the crosshair is formed from the corners of the room. The central lamp serves as a reference point.
If it is not centered, adjustments are made.


It is necessary to start glueing from the center, where there is a place for the chandelier (it is removed before work). At the same time, markings are performed for the location of the lamp in one square, cutting out a small hole in its center. This square will be the reference point for the main process. Symmetry will depend on how it is glued. If it is located parallel to the wall, the gluing of the same name is performed, if the corners of the fragment face the centers of the walls, a rhombus is glued.
Sometimes the center consists of 4 squares: in this case, for perfect alignment, they are folded together and a circle is drawn with a compass. This will allow, if necessary, to replace the fragment, not to remove the chandelier. If the work starts from the corner (parallel method No. 2), it is important to take into account that there will be cropped fragments along the edges, otherwise the drawing will be skewed. It is unacceptable that there is a whole square on one side of the wall, and only half of it on the opposite.


With regard to the complexity of the process, it is worth noting the difference: with the parallel method, it is easier to join the material. You can paste over the ceiling in any direction. It is permissible to do first one side of the central square, in order to correct the density of the tiles, if necessary, until the glue has frozen. With the diamond-shaped method, it is more difficult to paste over the ceiling. The work is carried out in a spiral tile by tile. Joints are more likely here, so special attention should be paid to glue and fitting.


Beautiful examples in the interior
To be able to appreciate the beauty of the ceiling tiles, it is worth referring to the examples of the photo gallery.
Seamless foam tiles with an abstract pattern look unique, complemented by plaster stucco decor.

A simple pattern, white color and an unusual chandelier look stylish and expensive together.

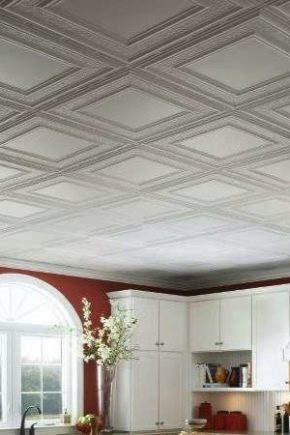
The material with a glossy surface and relief, laid out in a parallel method, will decorate the dining space.


Mirror tiles look stylish and visually change the perception of the room.

The bronze finish will decorate the interior of the bathroom: this technique will allow you to take a fresh look at the use of the material in different rooms of the home.


A combined type of perimeter finish with a center of liquid wallpaper or decorative plaster will add versatility to the ceiling.
It is worth supporting the tile with a chandelier decor.

The use of gilding in the decoration will give the interior a touch of classics, hinting at the solemnity of the palace.

For a nursery, the best solution would be to partially paint the surface of the cladding: delicate butterflies will create a feeling of lightness in the space.


For information on how to seal the seams of ceiling tiles, see the next video.


The comment was sent successfully.