All about laminated chipboard edging

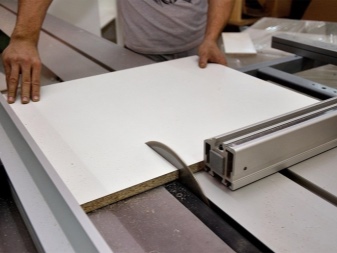
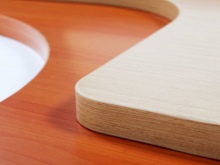
Composite material laminated chipboard is made by pressing small wood particles mixed with a special non-mineral glue. The material is inexpensive and great for assembling furniture. The main disadvantage of laminated chipboard is that its end parts are not processed, therefore, in section, they sharply contrast with the smooth surface, decorated with a textured pattern. Edging the slab allows you to give it a presentable appearance and hide rough edges.


What is it and why is it needed?
Laminated chipboard edging is the hiding of the end parts of the board by gluing on them a special decorative strip or edge, which can either be matched to the color of the main surface, or differ from it. In addition to creating an elegant appearance, edging chipboard also eliminates a number of other equally important problems.
- Protects the inside of the slab from moisture. After getting wet, chipboard can swell and lose its original shape, become brittle, which will subsequently lead to delamination and crumbling of the board. The edge keeps moisture out of the exposed end edges. This is especially important for damp rooms: kitchen, bathroom, pantry, basement.
- Prevents harmful insects or mold from breeding in the stove. Due to its porous structure, chipboard is a favorable breeding ground for various microorganisms, which eventually destroy it from the inside. The edge prevents insects from entering, thereby extending the life of the board.
- Protects against evaporation of harmful binders inside the product. In the manufacture of particle boards, manufacturers use various synthetic formaldehyde resins. During the operation of furniture, these substances can be released and enter the environment, which has an extremely negative effect on human health. The edge band keeps the resin inside and prevents it from evaporating.


All furniture manufacturers, as a rule, perform edging only on the visible end parts of the structure. This action is primarily due to their desire to save money, but for the end user this will eventually result in damage to the product, the need to repair or buy new furniture.
Therefore, edgebanding of chipboard is recommended not only for self-assembly of new structures, but also immediately after purchasing finished furniture.


Required tools and materials
To trim the slab with your own hands, you can use various decorative elements that differ in quality and material of manufacture, appearance, as well as cost. The choice will depend on the preferences and financial capabilities of the owner. But at home, two types of decorative stripes are most often used.
- Melamine edging - the simplest and most budgetary option. It is used to process inexpensive products and furniture structures. The main advantage of this material is the ease of gluing and affordable cost. Of the shortcomings, only a low service life can be noted, since melamine is rapidly destroyed by moisture or mechanical damage. Therefore, it is not recommended to stick it on furniture structures in children's rooms or kitchens. Melamine tape is perfect for hallways, corridors, when assembling auxiliary structures, such as shelves or mezzanines.


- PVC edge - more difficult to apply at home, as it involves the use of additional special tools. However, the product has higher strength, reliability and durability. The thickness of the PVC edge band can be from 0.2 to 4 mm, depending on the type and model. The PVC edge effectively protects the ends of the structure from chips, impacts and other mechanical damage.


It is advisable to glue a thick PVC tape on the front parts of the structure, because they are more susceptible to mechanical stress. For hidden ends, a thin edge will be enough, because there it will be needed only to protect against moisture and insects. In general, the thickness of such a tape is selected individually according to the size of the chipboard itself. For the correct gluing of the protective edges, you will need the following tools and devices:
- household iron:
- metal ruler;
- fine-grained sandpaper;
- large stationery knife or edger;
- felt fabric;
- scissors.
To apply PVC edgebands, you may also need a construction hairdryer, this will depend on the choice of material - there are tapes on sale with and without adhesive already applied. Edges with factory glue, or, as it is also called, hot melt glue, will need to be heated so that it softens and reacts with a rough chipboard surface.


How to glue the edge?
Before starting work, it is important to prepare not only the edge itself, but also the ends of the chipboard - their plane should be flat, without waves, grooves and protrusions. It is very difficult to align the edges by hand, for example, with a hacksaw, it is better to do it with a laser cutter or order a service from a specialized company where there are special devices and equipment.
If a new part is purchased, then its edges, as a rule, are already prepared and cut exactly.

Melamine
Before gluing, it is necessary to cut a piece of tape so long that it is convenient to lay it on the end of the product. You should not attach many separate pieces to one surface, since the joints will then be visible, but it is also not recommended to immediately use a long tape - then it will be difficult to guide and hold it in the desired position. Glueing is carried out in several stages.
- Fix the workpiece as rigidly as possible so that its edges extend beyond the working surface.
- Measure and stick an edge of the required length on the end of the board. It is important to make sure that the tape covers the entire surface of the chipboard, so it is better to take it with a margin, and then cut off the remnants.
- Iron the melamine edge through a sheet of paper with a heated iron. Ironing should be carried out gradually and evenly so that the glue firmly fixes the edge to the part, and at the same time no air bubbles remain under the tape.
- After the adhesive has cooled down, the trims of the edging tape on the sides of the board are removed with a knife. It is also convenient to do this with a metal ruler - having laid it tightly on the plane of the plate, draw it over the entire surface and cut off the unnecessary tape with "shearing movements".
At the end of the work, you need to clean the edges with fine sandpaper - remove any roughness and irregularities. This should be done very carefully so as not to damage the smooth laminated edge.
Immediately after gluing the tape and ironing it with an iron, the edge must be firmly attached until air bubbles are removed.


Pvc
There are PVC tapes on sale with and without adhesive. In the first case, you will need a building hair dryer to preheat the glue, in the second, you need to purchase the appropriate glue yourself. For these purposes, "88-Lux" or "Moment" is perfect. Stages of work:
- cut the edge strips of the required length, taking into account the margin - 1–2 cm on each side;
- apply glue to the surface of the tape in an equal layer, level with a spatula or brush;
- apply an adhesive directly to the ends of the chipboard blanks themselves and level;
- attach the PVC edge to the end of the plate, press it down and walk over the surface with a heavy roller or piece of felt, fixed on a flat board;
- let dry for 10 minutes, press and smooth the surface of the tape again;
- after final drying, cut off excess tape and sand with sandpaper.
If an edge with a ready-made factory composition is glued, then there is no need to wait until it dries. You just need to attach one edge of the tape to the end of the chipboard and, gradually warming up with a hairdryer, stretch it along the entire length of the workpiece and press it. Then also smooth and smooth the edges tightly, remove roughness.


Recommendations
It is convenient to press the tape to the end with an electric hand-held milling cutter - with its help, the edge will stick more densely and evenly to the chipboard surface, and air bubbles will be better removed. The same applies to clamps - in this case, they are necessary in order to hold the plate itself in an upright position, and not press the edge against it. If you wish, you can do without them - clamp the product between your knees, but this will make the procedure much more complicated, especially if the work is done for the first time.
In the absence of professional clamps, it is highly desirable to come up with a full-fledged replacement for them, at least from improvised materials, for example, a wedge clamp made of wooden bars and a screw. Identical bars are connected in the middle with a screw or bolt and nut, which regulate the force and density of pressing.
If the edging is applied to the finished assembled furniture structure, which itself is in a stable position, such fixtures are not needed.


For information on how to glue the edge on chipboard with an iron, see the next video.


The comment was sent successfully.