Making frames from a ceiling plinth

Paintings, photographs and reproductions help to complete the interior. At the same time, special importance is attached to their framing. From the material in this article, you will learn how to make frames from a ceiling plinth.

What is required?
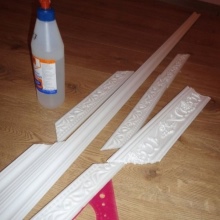
In the course of work, you may need different materials and tools at hand. It depends on the type of frame you are using. The main material will be a ceiling plinth made of expanded polystyrene. The foam analog is not suitable for frames, it is not dense enough and can break with a slight load.
Good frames are obtained made of polyurethane skirting boards... It is wear-resistant, has optimal flexibility and cuts well. Its only drawback is its high price.

In addition to the skirting board itself, you may need to work:
- cardboard, ruler, sheet of A4 paper;
- universal polymer glue (PVA, "Moment", "Dragon", hot);
- a sharp clerical knife (scissors or a hacksaw);
- construction (gypsum or acrylic) putty and spatula;
- brush, varnish, acrylic (water-based) paint;
- nylon thread;
- pencil or marker for marking.
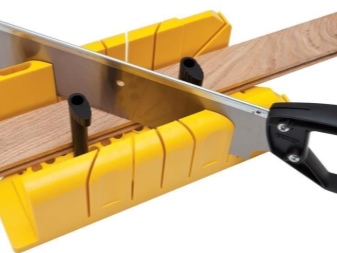
In addition, you cannot do without a miter box - a special carpentry tool for the perfect cut of the plinth at the right angle.


Frames can only be made from skirting boards. Some products are glued to wooden frames, fastened to a dense cardboard base. Therefore, not only the necessary tools and materials differ, but also the manufacturing technologies.
Someone uses in work plywood or the board 4-8 mm thick. It makes a practical basis for framing photographs or paintings. When working with these raw materials, you cannot do without a jigsaw or a saw. Among other materials at hand, one can note a sponge (foam sponge) for paints, newspapers.

What to consider?
When self-manufacturing a frame from a ceiling plinth, several nuances must be taken into account. Remember: regardless of the type of skirting board, it has a relief. It is not enough to cut it off at an angle of 45 degrees, you need to know how to hold the plinth correctly, otherwise you will not be able to achieve perfect joints. This is not a problem if the house has a miter box, but when it is not, the situation is different.
In this case, you need to hold the plinth during the cut perpendicular to the floor (it must be placed on the edge). In this case, the cut of the front side is slightly narrower than at the base of the skirting board. To do the job well, you need to practice cutting corners before cutting. The correction is fraught with the fact that instead of a rectangular frame, you can get a skewed trapezoid with angles of different sizes and gaps in the joints of the connection.

If the skirting board has a certain pattern, the frame size may differ from the desired one, because you have to adjust the pattern in the corners. If this is not taken into account, the pattern will not match, the aesthetics of the frame will suffer. If the skirting board is geometrically shaped without a pattern, only the grooves need to be adjusted. Therefore, the cut must be the same; its angle must not be changed.
Frames are made in different ways, but for their high-quality manufacturing it is better to use a template. As it, you can use both a base and paper with a lined cutout of the inner part of the frame. This will avoid skewing when gluing parts and fitting joints. As for the butt seams, they should be minimal.
In order for the frame to be of high quality, a plinth of the same width is taken for it. Even in a store, it may differ by a few mm.You need to choose the same molding from the same batch, comparing it with each other. Different widths can affect the stitching and joining of the pattern. If the molding is different, it will not work to connect it without a visible marriage.

How to do it?
It is not difficult to make a frame for a picture from a ceiling plinth with your own hands. You can make a decent frame from the ceiling plinth yourself in different ways. Depending on the type of product, you will have to:
- strengthen the back wall of the frame;
- prepare blanks for the future frame;
- collect the frame and process its joints;
- paint the frame, stick to the base.
At the very beginning of work, it is necessary to measure a picture or photograph for which you plan to make a frame. Necessary prepare a workplace, after which you can start working.


We offer a versatile option for making a frame that can be placed on the wall of any room. This type of frame has a background and is suitable for decorating pictures and photographs of different sizes. The work consists in creating the base and decorating it.
The step-by-step instruction consists of a series of sequential steps.
- Measure the size of the photograph (picture), give an allowance for the frame itself (exactly along its width), cut out the substrate from thick cardboard.
- Take a plinth, measure it in size and cut it with a miter box or a hacksaw at an angle of 45 degrees.
- "Fitting" is carried out, corner joints are trimmed if necessary.
- The parts are glued together, after drying, gluing defects are masked using a putty or silicone sealant.
- Excess material is removed immediately, without waiting for drying. In the future, it will be more difficult to remove it.
- After drying, the frame is primed with diluted glue, which is necessary for better adhesion to the paint.
- When the primer is dry, start painting the baseboard. Depending on the desired effect, it is decorated with a brush or a foam sponge (sponge).
- After the paint has dried, the frame is covered with a layer of varnish.
- Take the selected image, straighten it, and then pin or stick to the base.
- The details of the base with the image and the frame are combined into a single structure. The product can be hung on the wall.


You can make a frame without a foundation.... Such products are in great demand today among those who use them to create collages from the frames themselves. The technology for their implementation is even simpler. The main challenge will be to cut the plinth flawlessly at the right angle. The manufacturing technique itself is extremely simple:
- prepare a plinth of the required size with allowances for cutting edges;
- determined with the dimensions of the frame, after which they cut off the excess length from all 4 parts;
- the parts are glued together, then dried and, if necessary, correct the flaws with white putty;
- after that they are painted and decorated in accordance with the design idea.
Depending on the type of product, he make suspensions or supplement with holders for placement on a table, shelf, rack.


How to decorate?
You can decorate the frame yourself in different ways. The choice of this or that design depends on the taste preferences of the manufacturer. For example, a frame can be:
- cover with white paint, creating the effect of matte stucco molding;


- decorate using decoupage technique, pasting with special napkins with drawings;

- arrange under an old coating, creating the effect of cracks;

- decorate with ribbons, bows, beads and even sequins;


- supplement with gilding, silver, using the relief of the plinth pattern for the gold ornament;

- cover with colored paints, making the existing drawing contrasting.


Depending on the type of skirting board chosen, you can make a frame with glass, a frame with a metal effect (for example, bronze, copper, silver, gold)... At the same time, you can make frames of different shapes and sizes, creating thematic photo galleries or collages on the accent points of the interior. You can choose a design option for a specific design style (for example, classic, avant-garde), wallpaper, furniture, interior accessories.
You can decorate the frames both around the entire perimeter and in the corners.... Other craftsmen decorate frames with artificial leaves and flowers. Someone uses special corner elements, masking gluing defects with them. You can decorate the frame with ready-made carved corners.if you choose the perfectly matching width of the ceiling molding.
To match the decor with the frame itself, it can be painted with an identical paint. For one product, you can use several paints: as a substrate, the main color and gold, silver plaque. However, when choosing a dye, you need to be extremely careful. Some types of paints can destroy the texture of the skirting board.

Beautiful examples
We offer several examples of a beautiful design of frames from a ceiling plinth, made with our own hands from the remnants of building materials and improvised means:
- an example of the design of frames for decorating an interior in the style of a rural hinterland;

- laconic frames for decorating the wall in the bedroom;

- vintage frame with flowers, made in white;

- picture frames, made to match the moldings;


- frames for accentuating the walls of the dining room;


- photo frames as elements of the living room wall decoration;


- laconic framing of a panel for decorating a recreation area.


The following video shows you how to make a picture frame from a skirting board.


The comment was sent successfully.