How to make a DIY sprinkler?

The use of water sprayers and sprinklers in suburban areas is an opportunity to maintain the integrity of the soil and organize active plant growth. Sprinklers are in demand among summer residents and gardeners. Such systems are often used for watering small gardens, fields; more powerful sprinklers are installed in agricultural enterprises.
It is not always possible to purchase a sprinkler. If necessary, the water spray system can be made by hand.


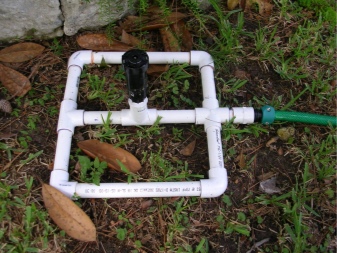
Homemade sprayer made of polypropylene pipes
One of the common options for a homemade sprinkler is to assemble a system from plastic or polypropylene pipes. To create a reliable sprinkler, you will need large area pipes. Specifications:
- length - up to 40 cm;
- diameter - up to 5 cm.

You will also need a clamp and a stick made of aluminum, at one end of which a plug is fixed. The sequence of actions is as follows:
- it is necessary to make two holes in the pipe, where the stick will subsequently stand (holes must be made in the center so that the pipes can be reliably hooked to each other);
- then you should install a stick in the holes and fix the structure with a clamp;
- the third stage involves making cuts in the aluminum pipe.
To test the performance of the sprinkler, it is worthwhile to lead a hose to the homemade sprinkler, from where the water will flow. If liquid splashes through the notches, the assembly is correct. Then you can start watering potatoes and other crops on the site.

We use a plastic bottle
The second option is to assemble a sprinkler from a plastic bottle and an awl. The procedure is quite simple and does not require special knowledge and skills. To get a sprinkler, you need to make holes in the hole with an awl and securely connect the hose to the neck of the resulting product. At this point, the stationary spray arm is ready.

What else can you make a sprinkler?
The third option is the most difficult. In this case, we will talk about the installation of a drip irrigation system and the calculation of the water consumption required for irrigation of the entire territory. Before you start assembling the system, you should draw a plan of the area to be watered.
Further, using special formulas, you need to calculate the amount of water that drip irrigation will require per day. Only then can you start drawing up drawings for the uniform distribution of tubes or tapes between beds, flower beds and other plantings.


Tools and materials
First of all, it is worth getting an electric drill or screwdriver. You will also need:
- plastic pipes with a diameter of 32 mm;
- plaster;
- valve with union;
- rubber or silicone gasket;
- drill with a diameter of 14 mm.


Also, the sprinkler can be assembled from polypropylene pipes with a diameter of up to 25 mm. In this case, you will need a 10 mm drill. When choosing a drill, you should pay attention to what material the device is capable of working with.
It is better to give preference to wood drills. Then it will be possible to avoid leaving the drill from the center of the future hole.


Mounting
The installation of a drip irrigation system is carried out in several stages.
- First, polypropylene or plastic pipes are brought to the tank where the water is stored.The container is pre-checked for tightness, as are the joints between the pipes. At the same time, both a standard metal barrel and a eurocube or a whole well can act as a reservoir.
- Next, the container is mounted on a stand to ensure the gravity of water. The height of the stand should be between 1 and 15 meters to prevent pressure build-up in the pipeline. If the site has a strong slope, then it is more profitable to install a pump that will regulate the irrigation system and supply water to the pipes in a timely manner. Otherwise, the height of the stand may not be enough to organize irrigation of the entire area.
- The third stage is the preparation of polypropylene or plastic pipes. To assemble the pipeline, it is necessary to cut pipe sections of the required dimensions. The length of the segment should correspond to the distance between the beds. In this case, a plastic filter tap must be installed at the ends of the cut pipe.
- The fourth step is to create holes through which water will spray. In a standard industrial sprinkler band, holes are made in increments of 200-300 mm. In this case, the step itself must be a multiple of 50 mm.

The last step is to connect the sections together to form a pipeline network. In this case, the initial segment must be connected with one end to the reservoir, from where the liquid for irrigation will come. It is recommended to use graphite grease or liquid soap when putting the tape on the tap.
The advantage of this method is that there is no need for clamps or other clamps. This is explained by the fact that, thanks to the support, there will be practically no pressure in the system. When the control nut is tightened, it will be possible to turn on watering and irrigate a summer cottage, a garden or a vegetable garden. If desired, you can also make a rotating structure by equipping the pipeline with racks and other elements.


Disadvantages of this method.
- The need to control the volume of water in the tank. If desired, this can be avoided by installing an electronic float system in the tank. However, this option is suitable when using a pump.
- Regular clogging of nozzles - holes in belts or tubes. The problem can only be solved by flushing the entire system. Also, in some situations, it will be necessary to replace filters in various sections of the pipeline.
The rest of the system has no drawbacks, but many people rarely turn to this method of assembling the sprinkler. Most people prefer to assemble the spray gun from a bottle or plastic pipe without building a system.

It is noteworthy that once the assembled scheme will always be relevant, and it can be used if it is necessary to organize an irrigation system in a new area. A competent approach to the selection of a sprinkler, the search for tools, materials and the subsequent assembly of the irrigation system will help preserve the fertility of the site.
For information on how to make a sprinkler from a bottle, see the next video.


The comment was sent successfully.