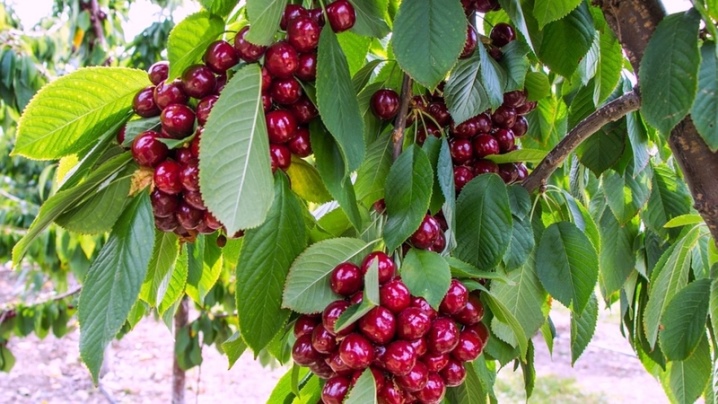
Nuances and technology of grafting cherries on cherries

Cherry grafting on cherries is not the most unique situation, this procedure is in demand among gardeners for many reasons. After all, the cherry itself is not a very fruitful tree. This culture is afraid of frost, rather painful and unstable to pests. Much easier for the gardener with a more predictable cherry. Therefore, grafting is a good option for a tree, the advantages of which will be more noticeable after such a procedure.
Features of the procedure
In a temperate climate, there is no need to talk about growing cherries without grafting on cherries. Most varieties without such measures will simply die from the first cool wind. A short summer is not enough for them, therefore their feasibility on the site without additional measures is questionable.
Attention! The stock is the plant onto which the shoot is grafted. The shoot itself (sometimes the kidney) is called a graft.

As a rootstock, young trees will be the best choice so that their trunk has a diameter of 1-2 cm, the Colt or Antipka varieties get along well with grafting. But with the scion it will be a little more complicated, one-year-old branches up to 1 cm thick are needed. It is better if these are branches of the lower tier, they are stronger and healthier there - with a high probability they will survive the transplant more easily. And experts also advise choosing cuttings located on the southern side of the plant: simply because of the greater development associated with sufficient light. As for the length of the scion - up to 25 cm. On one branch there should be 3-4 strong buds.

To cut a branch, you need to have a good, sharp pruner. It is important to cut clearly, and not to fray the edges of the branch. The cut should be perpendicular to the shoot so that juice losses are minimized.
If grafting immediately after this is not possible, the cuttings should be wrapped in a damp cloth, it is very important not to let them dry.

Terms and conditions
This can be done from late spring to early autumn, but the choice of the season for transplanting has its own nuances. If there is a choice of time of day, then early morning is the best option. You can also work late in the evening, but in the afternoon, under the scorching sun, it is risky to vaccinate. It is also good that there is no heat outside on the days of vaccination. Cloudy weather, rain is much better. Direct sunlight will not fall on the scion and will not be able to dry it until it fuses with the stock.

How the graft takes place in the spring: in early April it is more convenient to do this. The buds on the grafted branch should not be opened before grafting. The logic is simple, the leaves need water. To make it a stock or scion, it is necessary that a cambium forms between them. But it does not grow immediately, it takes time. If it is decided to plant cherries in the summer, this can be done in any month, at any time (with an eye on the weather). In autumn, it is better to cope in September, an extreme case - early October.

Also, an indispensable condition for the scion is the active principle of the juices, meaning the mother tree from which the stalk will be cut. If there is no beginning of sap flow, it will be difficult for plant tissues to grow together. If there is already a minus outside, this complicates the procedure: the tree may not endure frost. But if the plus is already established, and this is +5 at least, you can vaccinate.

Experts assure that most of the successful vaccination procedures occur in the spring.... If the region is southern, you can do this at the end of March, if the middle strip - at the beginning of April, if the northern region - even later.It is necessary to capture precisely those two spring weeks when the tree no longer sleeps, but the buds have not yet become swollen, there is still no movement of juices in the branches and trunk. During this period, the stalk takes root easily, grows together without defects and in a short time. Summer vaccination is limited by methods (only budding is possible).
Before the first frost, in any case, it should be at least one and a half months.

Preparation
We need to prepare the tools. What you need:
- good, sharp pruning shears (pre-disinfected);
- sharp and dull knives;
- garden pitch;
- leg-split;
- electrical insulation tape;
- gloves.

For scion, cuttings are harvested in December (southern regions), in November (in the middle lane). And if there is a short-term thaw, you should not count on it. For storage ahead of time, a place is chosen that is cool enough, for example, a cellar or a shed with insulation. A composition of sand, peat, sawdust is placed in a box made of wood or plastic; it has to be slightly moistened. The scion is sent to the box, which should be protected from light.
If there is no such protection, the very first thaw will lead to sap flow.
Also, cuttings can be stored even in the refrigerator, on the top shelf: first, the branches are wrapped in gauze, then very tightly wrapped in polyethylene. The material should not be allowed to dry out, but it should also not be allowed to be waterlogged. Also, the wood should not freeze.

Methods
There are several of them, each has its own advantages and disadvantages.
For the bark
The method is good for spring, while the buds have not yet blossomed on the branches. Several cuttings can be fixed on a single rootstock cut using this method.
How to do it right?
- Prepare the base tree... The saw cut must be made at a distance of 80 cm from the ground. Carrying out the procedure on the main skeletal branch, it is necessary to cut it horizontally, keeping a distance of 25 cm from the place where it separates from the stem part.
- The bark must be cut vertically, 4 centimeters. Move it back carefully, while it must remain intact and intact.
- In the lower part, you need to cut off a stalk with 3-4 buds, maintaining an angle of 45 degrees, 4 cm long.
- Place the cut scion under the bark, connect the cut to the trunk... Leave 2-3 mm above the cut of the tree.
- Secure the connection with electrical tape, twine. You can use scotch tape too. The sticky layer is laid out.
- All cuts and cuts are processed with garden pitch.
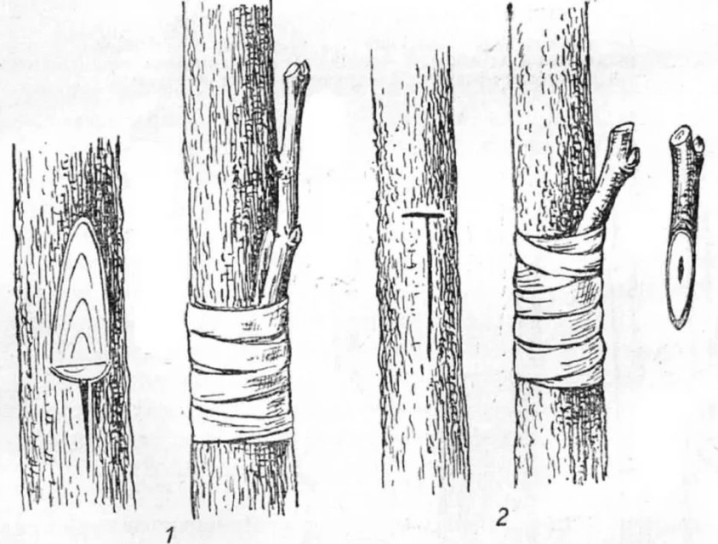
If done correctly, the graft will take root in 2 weeks. A scar of plant tissue will grow on the grafted site. The buds will soon come to life and are ready to bloom.
Copulation
This method is the most common, and in March, if there are no frosts anymore, you can safely use it.
How to graft cherries on cherries by copulating step by step?
- The rootstock and the scion need to be taken equal in thickness. On the rootstock branch, incisions are to be made, maintaining an angle of 30 degrees.
- In the middle, teeth are made so that the branches are better combined.
- The rootstock and the scion are connected tightly. If the scion stalk is slightly thinner than the branch of the main tree, one side should be aligned to maximize the articulation surface area.
- The branches are fastened with teeth, the cuts must match.
- The vaccination site is fixed with tape or electrical tape.
- The top graft is covered with a small piece of polyethylene. It should stay on the tree for 2 weeks. Then the package can be removed.
This method is simple and suitable for beginners. It is the only way to competently carry out the summer vaccination.

Into the cleft
The procedure is supposed to be in the spring. It is used if the stock and bark are deformed, if the tree needs to be cultivated or re-grafted. Up to four rootstocks are split in one place.
The process looks like this in stages.
- One of the main branches of the stock is sawn off about 30 cm from the central trunk.
- At the site of the cut, a split is made, the depth of which is 5 cm.
- On the cuttings of the scion, which has 5 points, a wedge-shaped cut is made, the length of which is 5 cm.
- The cuttings are split in order to combine the cambium layers.
- The branches are connected tightly.
- The contact point is fixed with tape or twine, another type of rope.
- Those parts that remain visible must be strengthened with garden pitch.
- Polyethylene is wound on top of the handle.
- After 3, or even 4 weeks, you can check whether the vaccine has grown together. If the buds are swollen and blossomed, then everything went well.

And a couple more methods that demonstrate a good grafting experience even on mature and old trees.
In the corner cutout
And this procedure is also designed for the spring, it helps to optimize the surface of the combined woody layers of the two crops.
The scion scheme is as follows.
- It is necessary to make a horizontal cut of the skeletal rootstock twig.
- A wedge-shaped corner cut is made on the side of the saw cut. From above into the saw cut, it should be deepened by 6 mm, at the bottom by 2 mm, and the height should be 5 cm.
- The selected twig is processed in the same way, it must match the cut.
- The rootstock and the scion are combined.
- There is a fixation with jute twine and electrical tape (optional).
- The graft is tightly covered with a bag or film. It is good if there is a small incision for ventilation.

So you can graft a tree whose variety is not the most resistant to the climate of the Middle Lane, for example.
Side cut
This method is somewhat reminiscent of copulation: the graft will grow in the lateral zone.
How is it going?
- We make an incision on the branches of the stock from the side, maintaining an angle of 15 degrees. Both the bark and the trunk must be cut.
- A side cut is made on the handle (angle - 30 degrees).
- The stalk is inserted into the cleft, the green layers of the cambium are combined.
- The graft is fixed to the trunk.
- Everything that remains open must be greased with garden varnish.
- The vaccination site is isolated (dust, water) with cling film or its equivalent.
- In the fourth week, you should check if the stalk has taken root. If the vaccination goes well, the kidneys will swell.

And if there is an annular damage to the trunk, and it is necessary to restore sap flow, they are inoculated with a bridge. You will have to insert the upper ends of the cuttings into the incisions above the injured area, making an arcuate bend. The damaged bark is pre-cut to living tissue, cleaned of debris and dirt.
Follow-up care
How to help a tree after a stressful procedure: first, you need to organize weekly watering for it. Secondly, it is necessary to apply root dressing, this is done before flowering and during fruit setting. If new shoots become noticeable on the rootstock, they must be removed: alas, they will take the juices from the tree, which will stop the development of the scion.
After the procedure, the tree needs to be inspected once a week - whether the vulnerable zone is hermetically closed, whether the treatment with garden varnish is sufficient.

As soon as the buds have blossomed on the scion, you need to remove the protection that secures the twine or electrical tape. You can fix a branch tire, a stick at the grafting site so that the birds (or even just a strong wind) cannot break the scion. New shoots that have grown over the summer on a scion need to be pinched at the end of summer. And already next spring, it is necessary to cut off the shoots on the scion so that the crown of the tree is aesthetic.
All the methods listed above show how to plant cherries on cherries safely and effectively and improve the varietal properties of the tree, yield, resistance, etc.


The comment was sent successfully.