Mauerlat studs

Mauerlat is a timber that fits the armored belt and the upper part of the wall around the perimeter of the house. It can be placed both on a regular wall and on masonry with a cornice. The way of fixing this bar depends on what the walls are built of. Most preferred are hairpins.

What are they?
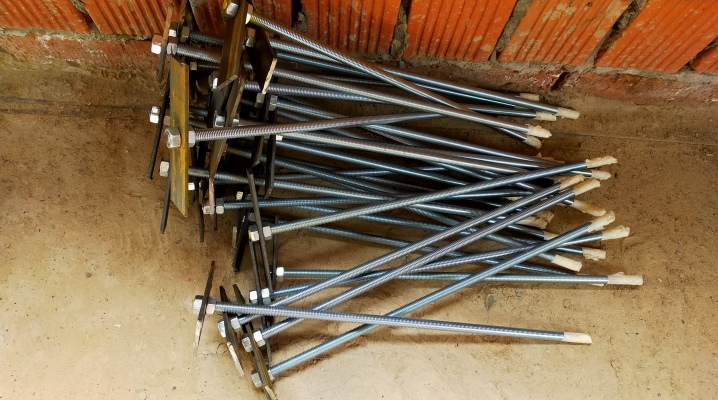
Ordinary hairpins are half-meter-long segments into which a rod longer than these segments is cut. They don't require any special training. The diameter of the studs should not be less than 14 mm - this will create additional ribs (and points) of rigidity. The material from which the studs are made is only steel: it is she who well dampens the vibrations of the roof that occur during a storm or hurricane. At the same time, the Mauerlat (and with it the entire "skeleton" of the attic and roof) should not lose its strength properties for at least 50 years.
Since the hairpin in its structure and classification is not far from a full-fledged anchor bolt, so-called chemical bolts are used. This is a stud (simple or anchor bolt), for which an adhesive is used to hold it in the brickwork. The simplest type of adhesive is epoxy adhesive.


The resin and hardener that make up the glue form an ultra-strong polymer layer, which is not inferior in quality to other adhesives or, for example, tempered glass.
The required amount of epoxy glue is poured into the pre-drilled hole, then a pin is driven into it. The composition, spread between the inner walls of the hole and the thread of the stud, sets after a two-hour hardening process. After a day from the moment of setting, the compound gains its ultimate (declared) strength.
The hairpin can be welded to the backbone of an armored belt assembled from reinforcement segments by welding. To achieve the greatest strength, before laying the armopoyas, the pins under the Mauerlat are placed in brick, stone, cast concrete or foam / aerated block masonry, in which holes are pre-drilled.


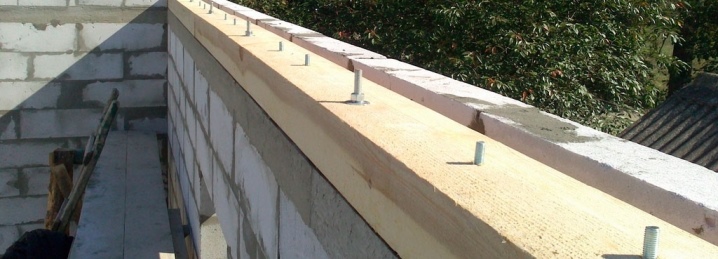
Before laying and pouring the armored belt, the pins are glued into these holes in the above way. Laying and welding the armopoyas frame, these studs are welded to it. As a result, the frame is distinguished by the maximum strength - the studs, and with them the Mauerlat, are held by the wall itself and the armored belt laid on top.
The embedded hairpin axis must necessarily have an L-shaped bend at the opposite end. In the case when glue landing is not applied, the lower (shortened) part of the part located at right angles to the main (much longer) part is deepened into 4–5 rows of brickwork or 2–3 rows of foam blocks. Bricks or foam blocks are laid so that the seams coincide with the location of the stud.
The bricks or blocks of the last row are drilled in the right place and put on one by one on each stud, laying on a previously applied layer of cement-sand mortar or cement glue.


How to choose?
The more slopes at the roof, the heavier the entire attic-roofing structure. For a hipped roof, significantly more roofing iron, lathing and rafter boards, a support bar will be required than for a single-pitched one. Despite the fact that the total number of fasteners in other elements other than the Mauerlat is used more, the number of studs connecting the wall, the armored belt and the timber itself around the perimeter may also be larger.
For a pitched roof, studs with a diameter of 14 mm are suitable. A gable or quad may require 16–20 mm studs. Do not skimp on the quantity and strength of this building material: an insufficient margin of safety can lead to the fact that the roof, at best, will slide along with the attic away from the hurricane gust (due to cracking and breaking of the studs), at worst - a house or other structure will undergo significant destruction.


The diameter of the studs does not depend on the wall material (stone, brick, timber, log, foam or gas block): load-bearing walls, which gained the declared margin of safety during their construction, will not fail, and the rafter-Mauerlat roof system is fixed thoroughly. The welded or glue method of additional fixing of the studs does not depend on the building material of the walls and armored belt, all materials are seized with glue or fasteners quite reliably.
How to use?
The step of installing the hairpin sections, ideally, should coincide with the step of fixing the rafters, which are positioned and fastened immediately after installing the Mauerlat, beds and racks of the attic-roof structure. Simply put, where the hairpin is, there is the rafter. This is the easiest calculation. For reliability, you can fix the Mauerlat with a wall and an armored belt at least every 60 cm.
The maximum distance between the studs, however, must not exceed 1.5 m.


The markings on the wall are installed immediately after laying a row of bricks, stones or blocks, on top of which an L-shaped hairpin is placed. In the simplest case, an even segment is bent so that the folded part does not exceed 10 cm in length. Further, the hairpin passes between the rows of bricks, armopoyas and Mauerlat as follows:
- not less than 40 cm - through the upper rows of the wall masonry;
- 15–20 cm - armopoyas (data are given with the greatest margin for one-, two- or three-story buildings);
- 15–20 cm - Mauerlat bar;
- the remaining 3-5 cm is a margin for washers and nuts.
Taking into account all sections, the total hairpin length can reach 1 m. At the same time, its effective height - from the upper end to the bend to the side - in this case is about 90 cm.The diameter (size) of the holes in the bar should not be noticeably larger than the diameter of the hairpin - it should pass through them freely, but should not dangle.


Drilling holes in the Mauerlat bar is carried out using a pen drill. For holes in the armored belt and in the masonry, a conventional concrete drill is used. However, you can drill foam and gas blocks using ordinary metal drills - their porous structure may not withstand the shock and vibration load from the drill, which can cause the foam block to crack.
Drilling of foam blocks, like wood, is performed in a shockless mode.
To install and secure the Mauerlat on a hairpin, you will also need a sledgehammer or a large hammer and an adjustable (or open-end, tubular) wrench of the appropriate size. The tightening must be neither overtightened nor loose: if you do not turn it over, the connection will disperse during vibrations, and if you overtighten, the bolts and studs may burst.


The comment was sent successfully.