How to make a shower out of a barrel?
An outdoor shower at a summer cottage is one of the main elements of improvement, without which it is impossible to maintain personal hygiene in hot summer weather. The opportunity to refresh yourself is especially important during the seasonal work on the farm. The simplest and most effective method is to build a summer shower from a barrel with your own hands.

Peculiarities
On an average suburban area, there are usually no utilities, the arrangement of an individual well on a budget is quite an expensive pleasure. Many summer residents use alternative methods of water supply, stocking up with water from a well or a natural source.
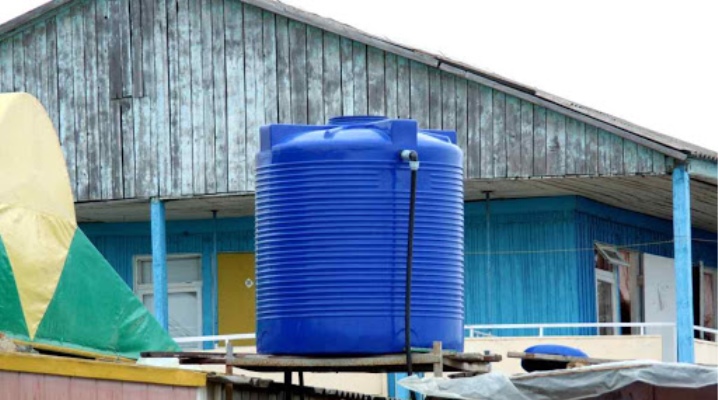
During a holiday in the countryside during the hot season, it is important to be able to take a shower, especially after working on the site or in the workshop. The construction of a simple structure will help to solve this issue: a barrel of water installed at a level of 2-3 meters above the ground, equipped with a spout with a shower head. You can choose both zinc and plastic containers. Recently, preference has been given to cheaper polymers that are durable and easy to use.


Most types of plastic can be used, but the following options are most often preferred:
- polycarbonate;
- polyvinyl chloride;
- polypropylene.
The safest is considered to be polyethylene terephthalate, which is used in the production of containers for drinking water and food products. Various plastic tanks are easy to find commercially. The most popular barrels for installing a shower in the country are classic-type barrels - cylindrical.
Before equipping an outdoor shower with a barrel, it is important to think over the structure of the frame for the container, the way of its fastening and how to build a drain for water. You must first make sure that the inside of the container is clean.


The best option is a tank in which food products were stored.
Organization of drainage
If you plan to use a shield for the floor, a special hole is made for draining. If there are boards, they are laid so as to create gaps between them through which water will flow. In this case, it is necessary to think over a water collector to drain the liquid, which will be drained into a septic tank or a sump - a pit. It is very easy to do this by using an old waste tub that has a cut-off bottom. It is placed under the shower on the ground. It is good that parts such as the pipe and siphon are preserved in the bath. The most suitable for draining will be plastic pipes that lead to a septic tank.


Frame installation
The main condition that must be met when installing a volumetric container is safety. Due to the heavy weight of the tank filled with water, the barrel is quite stable, but it is important to prevent it from falling into the cabin. As a standard, a reinforced plank flooring or a frame made of timber is mounted on the site of the structure being constructed. Wood and metal are suitable for the frame under the outdoor shower. Since a volumetric barrel with water will be placed on the roof of the shower stall, it is important to pay attention to its strength when constructing the frame. This item is especially relevant with regards to wood structures. To strengthen the frame, it is recommended to use jibs in the construction. But the more reliable is the steel frame. The cylindrical barrel is additionally fixed with cable clamps, chains or metal strips so that the wind does not change the position of the empty vessel.


Barrel installation methods
One of the disadvantages of the classic barrel is the shape of this container. It is worth figuring out in what position it is better to place it on a pitched roof.
If the tank is installed upright, it has a pronounced windage and needs additional fastening. It is advisable to install the cylindrical barrel on the roof just lying down. But in a horizontal position, you will have to extremely tightly seal the holes in the top of the lid. For plastic drums, the horizontal arrangement is more advantageous. Especially on sloped roof surfaces. Do not worry that in this way the pressure will be weaker. This will not affect the water pressure in any way. The vertical installation has two significant disadvantages.
- The barrel is harder to secure in this position. You will have to take care of a strong fastening for the lower part or stretch it on the cables.
- Heated water is unevenly distributed. The height of the 230-liter barrel is almost a meter. According to the laws of physics, the entire volume of warm water will be at the top, and the water will remain cool below. It will take a lot of cubes of water to get a warm shower.


How to fix it correctly?
On a flat shed roof, it is important to correctly fix a heavy barrel of 200 liters or more. You can strengthen the container with your own hands using nylon slings, strong ropes or cables. Fastening is made to the corner posts of the frame or anchors.
If the summer shower barrel is placed horizontally at the top, it is important to reinforce it so that it does not slide down.
The easiest way is to block the sideways movement of the container with bricks or two cinder blocks placed under it.


How to make a hole?
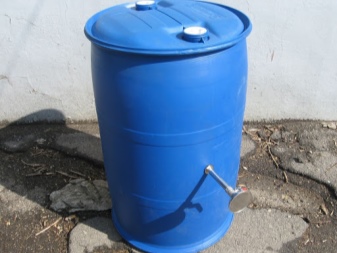
It will be difficult to make a hole in a galvanized container on your own without certain skills. If the barrel is made of metal, then you will need a drill and drill equal to the diameter of the tap tube. With PVC containers, everything is easier: in principle, a sharp blade and a pencil are enough to mark the hole, it is important to do this carefully, without damaging the barrel.
Therefore, we will consider a tap in a plastic container. This is a simple process that any owner can handle. It is important to insert a tap in accordance with all the rules, since cracks may appear in this place, eventually entailing destructive processes. As a result, the barrel will have to be changed, since the leaks are difficult to repair. To make a high-quality sidebar, you will need:
- suitable rubber gaskets;
- a pair of steel plates;
- bolts.
The water supply will be regulated by a tap or by means of a foot device in order to save heated water.


The workflow consists of several stages.
- First of all, you need to prepare everything required, including a watering can and a tap. The easiest way is to use a plastic structure, complete with a tap, a watering can and a float to determine the water level. But the system can be assembled on your own by purchasing all the necessary items in any of the plumbing stores. It is important to take into account that the nodes are suitable for each other.
- It will be possible to equip the water level in the barrel with your own hands, using the original version: a piece of plastic tube with a rubber glove is lowered into the barrel, when the barrel is filled with water, air is pushed out, and the glove is inflated. This serves as a kind of signal that the tank is full.
- A feather drill or crown is suitable for making a hole, and craftsmen also advise using superglue. And some artisanal craftsmen achieve the desired diameter of the insertion point with a sharp knife.
- Once the hole has been made, the plastic pipe can be attached. This is a simple manipulation, just a nut with a rubber seal is placed on the outside. Similar elements are installed inside, and the system is carefully clamped so that the rubber rings are not damaged. The shower can be cut from the bottom or from the side - according to personal preference.The rain shower is also attached via a hose to be used as in a standard shower.


Most often, plumbing parts are purchased at retail outlets with household goods. Such a set will be inexpensive, and if you wish, the system can be mounted on your own. As a summer cottage, a tip from an unnecessary garden watering can is suitable. Almost every summer resident has such equipment for watering plants. The main thing is to remember that there must be a tap between the watering can and the container, which will prevent water from leaking from the barrel after the start of its filling. It is allowed to use a crane of any modification. Most often, ball models with a 45-degree turn and an extended handle are chosen, which is much more convenient and more practical during operation.


Final assembly of the structure
Correctly attaching a watering can in the shower is just as important as assembling the system properly. The work is carried out in a specific order.
- First of all, it is necessary to build a structure where the container will be installed. The frame must be able to support the weight of the filled barrel, which is important for operational safety. When assembling the frame, the configuration of the tank must be taken into account so that it is installed as stable as possible. For round shapes, it is better to make oval grooves in the supports, and when the barrel is installed vertically, then additional bars or metal analogs are attached in the area of its location.
- It is better to start the installation of a shower barrel with a trial location to make sure that the structure will be reliable and nothing will interfere with this. Further, the barrel is strengthened in two of the proposed ways: wide straps made of durable synthetics, which are durable and practical options, or perforated flexible steel tape. This material is even more robust and can conform to the shape of the reservoir, providing the tightest possible grip.


At this, the work on assembling the structure can be considered completed. You can fill the barrel with water and use the installed system for its intended purpose.
How to make a shower from a barrel, see the video below.


The comment was sent successfully.